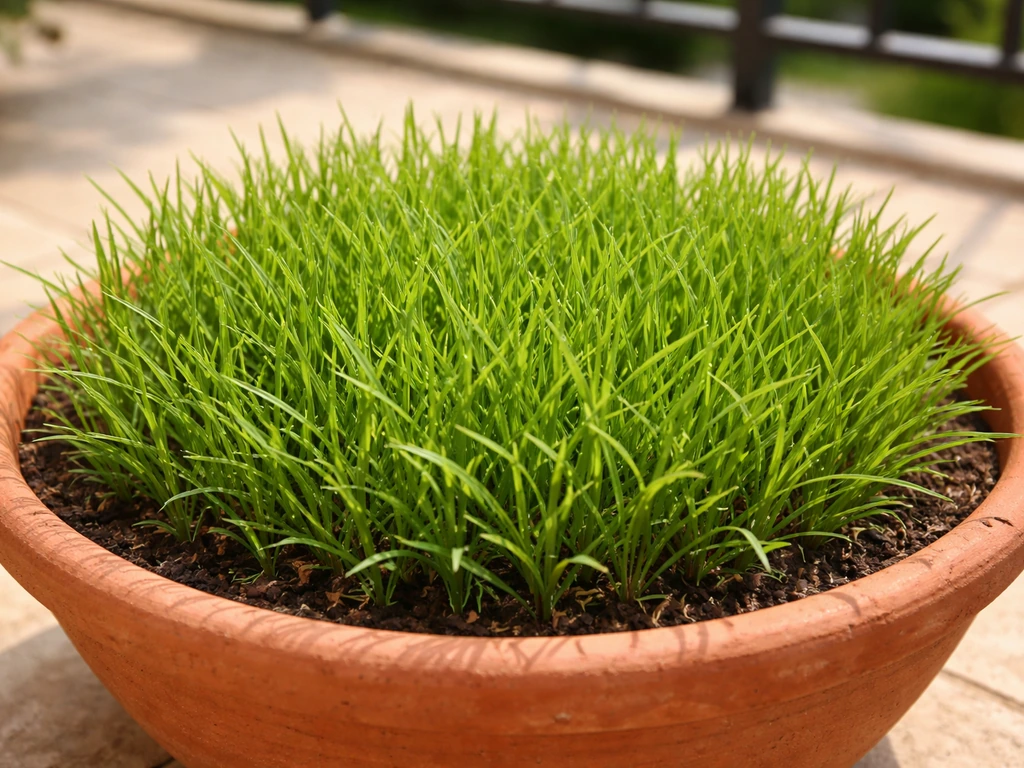
You can absolutely grow durva grass (Cynodon dactylon, also called bermuda grass) in pots, and it's one of the easier grasses to establish in a container once you understand two things: it needs full sun and good drainage. Skip either of those, and the grass struggles. Get them right, and you'll have dense, lush, harvestable durva in about 4 to 6 weeks from planting.
How to Grow Durva Grass in Pots Step by Step Guide

Marcus Whitley
6 May 2026
What durva grass actually needs to thrive
Durva is a warm-season grass, which means it is genuinely heat-loving. It grows best when daytime temperatures are above 24°C and does well anywhere in the 17–35°C range. If your nights are dropping below 10°C regularly, the grass will slow down or go dormant, and below 0°C it essentially stops growing entirely. So if you're in a cooler climate, plan your planting around late spring through summer, when nighttime temps stay reliably warm.
Sunlight is non-negotiable. Durva needs a minimum of 6 hours of direct sun daily, and 8 hours is better. This is probably the single biggest reason container durva fails indoors or on shaded balconies. If your balcony or windowsill gets good morning sun, that works. A south- or west-facing spot is ideal. Don't try to grow it in indirect light and expect much.
Watering is where most beginners overthink it. Durva is drought-tolerant once it's established, but during the first two to four weeks, the top inch of soil needs to stay consistently moist. After that, you can ease off and water deeply but less frequently, basically letting the top half-inch dry out between waterings. Think of it as a two-phase relationship: baby it while it's rooting, then trust it once it's settled.
Choosing the right pot and drainage setup
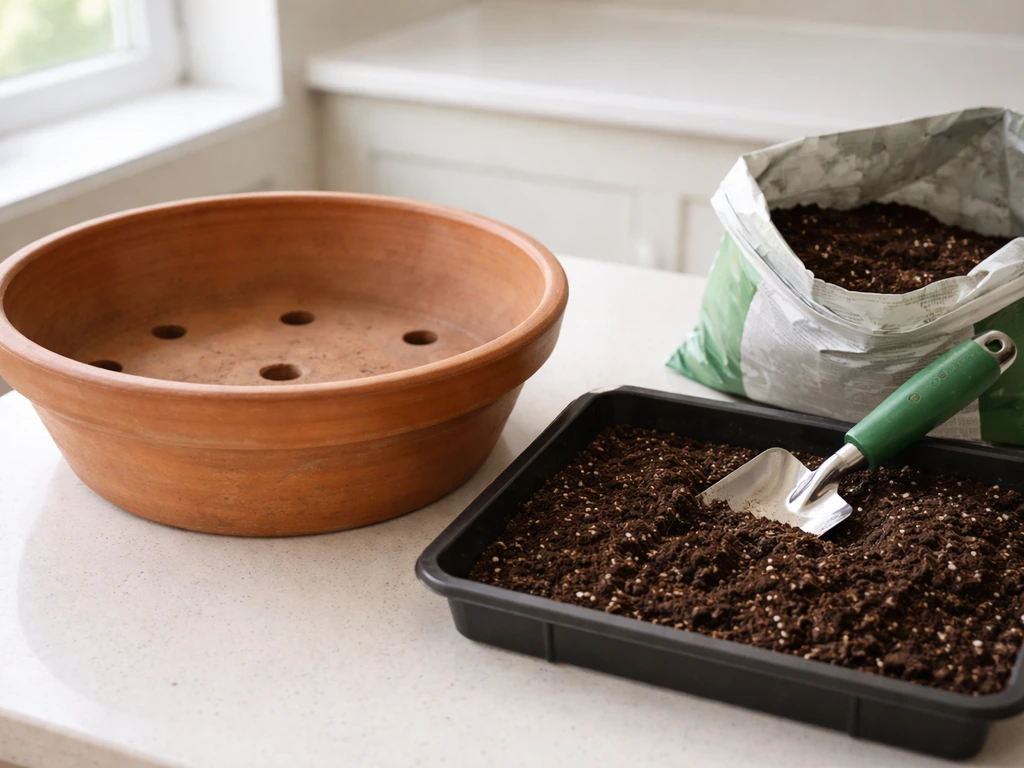
The best pot for durva is wide and shallow rather than tall and deep. A pot that is about 30–45 cm (12–18 inches) wide and 15–20 cm (6–8 inches) deep gives the grass plenty of room to spread its surface runners (stolons) and develop a strong root network. If you want a lush, dense patch for regular harvesting, go wider. A single 45 cm pot can give you a surprisingly generous cutting.
Drainage holes are absolutely essential. Durva sitting in waterlogged soil will rot. No drainage holes means no durva. If you're using a decorative outer pot without drainage, make sure your actual planting pot drains freely inside it, and empty any water that collects at the bottom of the outer sleeve after watering. Never let the inner pot stand in pooled water.
One thing worth knowing: the old advice about putting a layer of gravel at the bottom of a pot to improve drainage is a myth. It actually creates a perched water table that can keep the bottom of your soil wetter than you want. Skip the gravel. Just use good potting mix and make sure your drainage holes aren't blocked.
Terracotta pots work well for durva because they're porous and help prevent overwatering. Plastic pots are fine too, especially if you're in a hot, dry climate where moisture retention is actually useful. Just make sure there are enough holes at the base, or drill a few extra if needed.
Seeds vs slips and stolons: what's actually worth using
This is the part where I'll save you some frustration. Seeds can work, but stolons (the creeping surface runners) are faster, more reliable, and honestly the method I'd recommend to anyone starting out.
Starting from stolons or grass clippings

Durva spreads naturally through stolons, which are aboveground runners with nodes at intervals. NatureServe Explorer notes that Cynodon dactylon primarily [propagates through rhizomes and stolons](https://explorer. natureserve. org/Taxon/ELEMENT_GLOBAL.
2. 150510/Cynodon_dactylon), which are key to its vegetative spread. Oregon State University’s Forage Information System describes stolons as segmented, horizontal stems that remain chiefly above ground, with nodes that can produce new aerial shoots [aboveground runners with nodes at intervals](https://forages. oregonstate.
edu/regrowth/developmental-phases/vegetative-phase/rhizomes-and-stolons). Each node can root into soil and produce a new plant. If you can get hold of a few handfuls of fresh durva grass with visible runners, you're in business. You can pull them from a lawn, get them from a friend's plant, or buy them from a nursery.
Lay the stolons horizontally across the surface of your prepared pot, press them lightly into the soil, and water well. Within a week or two, the nodes will start anchoring and shooting upward.
This method is much faster than seeds and gives you a head start, especially if you're growing for religious or regular harvesting purposes where you want usable grass quickly.
Starting from seed
Seeds work, but there are a few catches. First, if you're buying hybrid bermuda grass seed, know that many hybrid varieties produce little or no viable seed and must be started from stolons or plugs. For durva specifically, try to source open-pollinated or common Cynodon dactylon seed rather than named hybrid varieties. Second, germination takes 7 to 14 days depending on soil temperature and moisture. You need to keep the top inch of the potting mix consistently moist for the entire germination period, or the seeds will dry out and fail. Scatter seed lightly over the surface, press it down gently, and keep the pot in a warm, sunny spot. Don't bury the seed deeper than about 3–4 mm.
| Method | Speed | Reliability | Best For |
|---|---|---|---|
| Stolons/slips from existing grass | Fast (roots in 7–14 days) | High | Anyone who can source runners |
| Seed (open-pollinated) | Slower (7–14 days germination, then weeks to fill in) | Moderate | When stolons aren't available |
| Plugs/clumps from nursery | Fast (similar to stolons) | High | Beginners wanting a guaranteed start |
My honest recommendation: if you can get stolons from an existing durva plant, even just a small clump, use that. It's more forgiving than seeds, especially for beginners.
Getting the potting mix right and feeding your durva
Durva prefers a slightly acidic to neutral soil, ideally in the pH range of 5.5 to 6.5. Most standard potting mixes fall somewhere in that range already, so you don't need to overthink this. If you're mixing your own, combine regular potting compost with some coarse river sand (about 60/40 or 70/30 compost to sand). The sand improves drainage and stops the mix from compacting too heavily. Avoid using pure garden soil in a pot; it compacts badly and drains poorly.
For fertilizing, durva isn't a heavy feeder but it does appreciate a boost during the growing season. Use a balanced slow-release granular fertilizer (something like a 10-10-10 NPK) at planting, worked lightly into the top layer of soil. After that, a liquid feed every 3 to 4 weeks during active growth is plenty. If your grass starts looking pale or yellowish despite good sun and watering, a nitrogen-focused liquid feed usually fixes it within a week. Don't over-fertilize, though. Too much nitrogen in a pot encourages lush, soft growth that's more vulnerable to disease.
Your regular care routine after planting

Watering schedule
For the first month, water daily or close to it. You're trying to keep the top inch moist at all times to support root and stolon establishment. After the grass is clearly spreading and rooted (you'll see new green shoots filling in), shift to a deep watering two to three times a week, letting the surface dry slightly between sessions. In very hot weather (above 35°C), you may need to water daily again temporarily. The classic advice of poking a finger an inch into the soil still works perfectly: if it feels dry at that depth, water. If it's still damp, wait.
Trimming and mowing in a pot
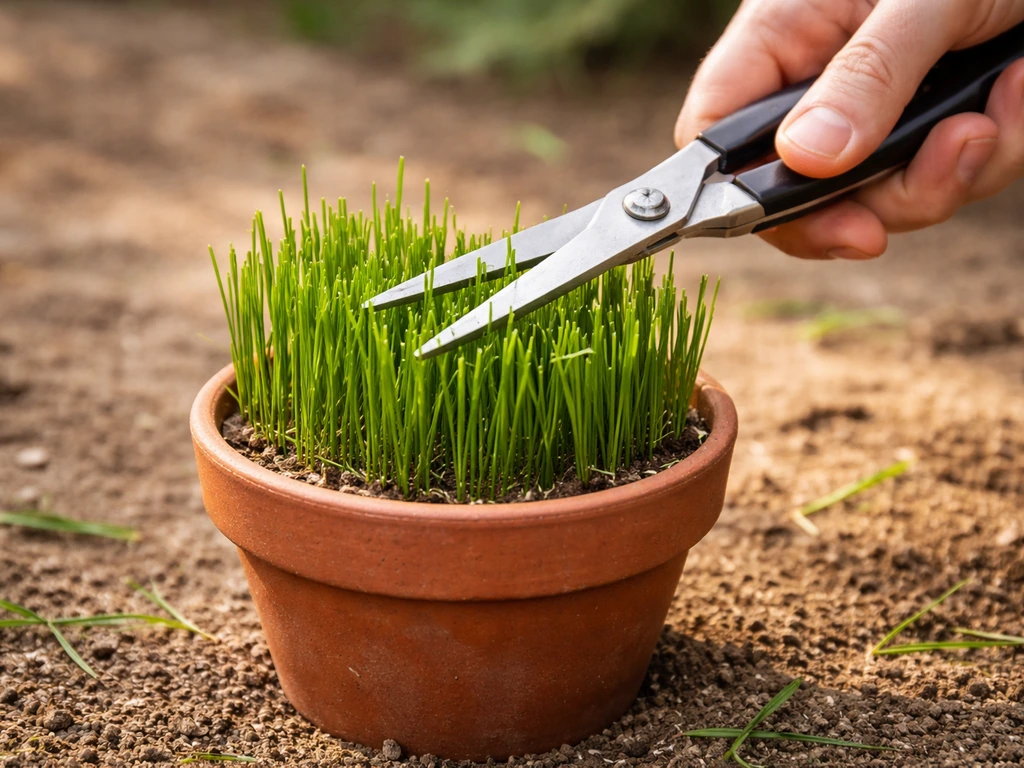
Once your durva reaches about 7–10 cm tall, give it a trim. In a pot, you won't be using a lawnmower, obviously. A pair of clean scissors or garden shears works perfectly. Trim down to about 3–5 cm above the soil surface. Don't scalp it right down to the base, especially while it's young. Regular light trimming actually encourages the grass to spread laterally and become denser, which is exactly what you want. Once it's established, cutting every 2 to 3 weeks keeps it lush and prevents it from getting leggy or matted.
Keeping weeds under control
Weeds are less of a problem in pots than in garden beds, but they do appear, especially if you're using garden soil or outdoor compost. The best defense is a healthy, dense stand of durva. Once your grass fills the pot, there's little room for weeds to establish. In the early weeks, hand-pull any weeds that appear promptly. Don't let them get established alongside young durva, because they'll compete for the same nutrients and water.
Troubleshooting when things go wrong
Seeds not germinating
If nothing has appeared after 14 days, the two most likely culprits are soil that dried out during the germination window, or temperatures that are too cool. Check that your pot is in a genuinely warm, sunny location. If your ambient temperature is below 20°C, germination will be very slow or may not happen at all. Try bottom-watering (sitting the pot in a shallow tray of water for an hour) to ensure even moisture without disturbing the seed surface.
Patchy or uneven growth
Patchy growth is almost always a light or watering distribution issue. If one corner of the pot is in shade for part of the day, the grass there will thin out. Rotate your pot a quarter turn every week or two to make sure every part gets equal sun exposure. Uneven watering can also cause patchy spots, so make sure you're wetting the whole surface area when you water, not just the centre.
Yellowing grass
Yellow durva usually means one of three things: nitrogen deficiency (feed with a liquid fertilizer), overwatering and root stress, or the grass going dormant because temperatures have dropped. Check which season you're in first. If it's warm and you've been watering heavily, ease off and check the roots. Healthy roots are white or pale; brown, mushy roots mean root rot from too much moisture. If it's autumn or temperatures are cooling, yellowing and dormancy is normal and nothing to worry about.
Fungal issues and rot
Durva can develop fungal problems when conditions stay warm and humid for extended periods, especially when the foliage stays wet. Dollar spot appears as tan or straw-colored patches, sometimes with reddish-brown margins, and you may notice white cottony mycelium on the blades in early morning before it dries. Leaf spot diseases cause dark spots or blotches on individual blades. Both are made worse by overwatering, poor air circulation, and cutting too infrequently (which creates a dense, damp thatch). If you spot these, reduce watering, cut the grass shorter to open it up to airflow, and avoid watering in the evening so blades dry before nightfall. In most cases, improving conditions clears mild fungal problems without needing any spray.
Harvesting durva and keeping it regrowing
When harvesting durva for ritual or medicinal use, the key rule is: never cut more than one-third of the plant's height at once. If your grass is 9 cm tall, cut to about 6 cm, not lower. Cutting too aggressively, especially in hot or dry conditions, stresses the plant and slows regrowth significantly. Use clean scissors each time to avoid introducing bacteria or fungal spores to fresh cut surfaces.
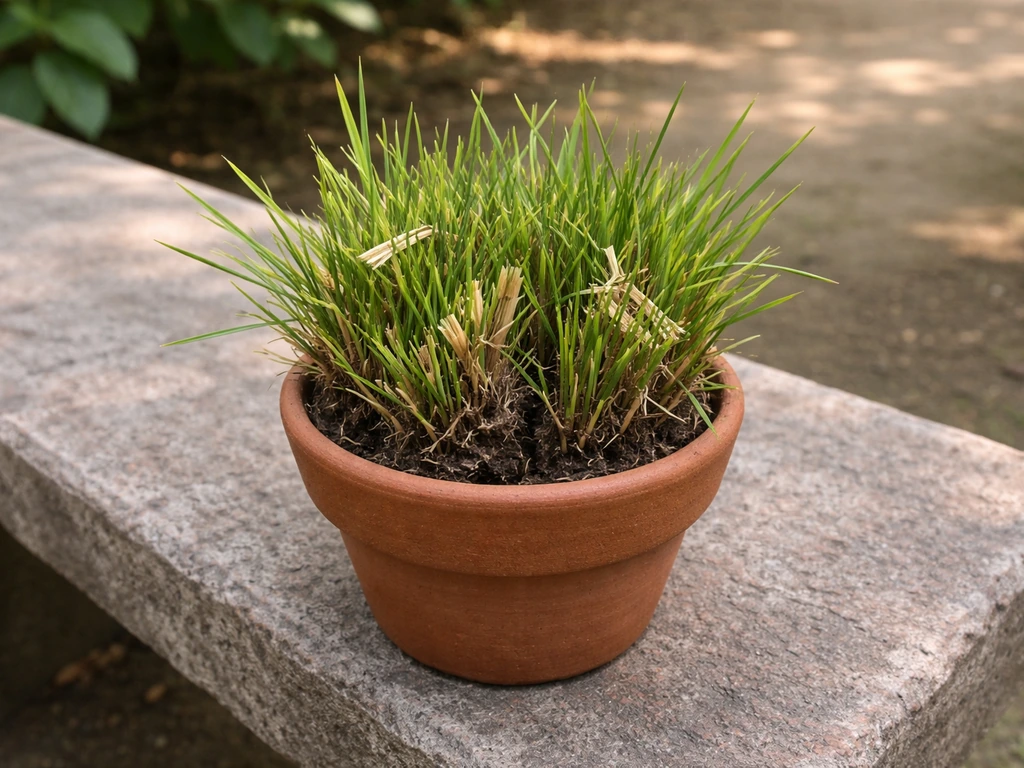
Regrowth after a light harvest is quick during warm months. You can expect new growth within 3 to 5 days, and the grass will typically be ready for another harvest in 2 to 3 weeks. This cycling is one of the best things about growing durva in pots: a single well-maintained container can give you regular cuttings through the entire warm season.
After 6 to 12 months, the potting mix may become compacted and depleted. When you notice slower growth or the soil looking very dense, it's time to either refresh the top 2–3 cm of soil with fresh compost or repot entirely into fresh mix. This also gives you a chance to divide the root mass and start a second pot if you want more coverage. Spring is the best time to do a full repot, right as the growing season kicks in.
Your first 4 weeks: a simple action plan
Here's how to set yourself up for success from day one.
- Choose a wide, shallow pot (30–45 cm wide, 15–20 cm deep) with drainage holes.
- Fill with a 60/40 mix of potting compost and coarse sand. No gravel layer at the bottom.
- Plant stolons laid flat across the soil surface and pressed gently in, or sow seed at 3–4 mm depth. Place the pot in full sun.
- Water daily for the first 2 to 4 weeks, keeping the top inch consistently moist.
- Once the grass is clearly rooting and spreading (around week 2–3), reduce to watering 2–3 times a week.
- Give the first light trim when grass reaches 7–10 cm, cutting down to about 5 cm.
- Start a light liquid feed every 3–4 weeks from week 3 onward.
- Harvest as needed once the grass is established and dense, always cutting no more than one-third at a time.
If you're also exploring other easy-to-grow plants for pots alongside durva, gotu kola is another low-maintenance option that shares some of the same care principles, particularly around moisture and compact containers. If you're also exploring other easy-to-grow plants for pots alongside durva, how to grow gaura in pots is another great related option to compare container care basics.
If you want to try it too, learn how to grow gotu kola in pots by matching light, moisture, and pot size to what this plant prefers. And if you enjoy growing useful or functional plants in limited spaces, gongura is worth looking at too. Gongura in pots does best with consistent moisture in the root zone and plenty of sun. Both are genuinely beginner-friendly and rewarding in container setups.
If you want more annual flowers for containers, you can also grow godetia in pots for colorful blooms can you grow godetia in pots.
Growing durva in pots really does work. The biggest thing I can tell you is to trust the process during those first two weeks, keep the moisture up, and don't panic if it looks a little sparse early on. Once those stolons start rooting, the grass takes off fast, and you'll have a productive, attractive pot of durva that you can harvest again and again.
FAQ
Can I grow durva grass in pots indoors, near a window?
You can try, but the window has to deliver direct sun for most of the day (aim for at least 6 hours). If you only get bright light without true sun, durva will thin out. For indoor setups, rotate the pot often and consider a grow light that can provide strong full-spectrum light, then transition outdoors gradually once temperatures are warm.
What pot size is the minimum for growing durva for harvesting?
If you want a usable harvest, go no smaller than about 30 cm wide and 15 cm deep. Narrower or deeper pots tend to produce slower lateral spread because durva spreads via surface runners that need room. Wider pots also let you harvest more evenly across the container.
How often should I water after the first month, and how do I avoid overwatering?
After rooting is established, water deeply but less frequently, typically when the top half-inch is dry. Always lift the pot to judge weight, because surface dryness can be misleading in dense mixes. If you see persistent yellowing plus soft, brown roots when you check, you are likely holding too much moisture.
Should I put gravel or stones at the bottom of the pot for better drainage?
No. A gravel layer can trap water above it and create a wetter bottom zone where roots may rot. Instead, rely on drainage holes plus a well-aerated potting mix, and make sure outer decorative sleeves never keep the inner pot standing in water.
Why does durva keep dying back even though it keeps sprouting?
Common causes are cold exposure (night temperatures too low), drought during the establishment phase, or a pot that stays waterlogged. Another frequent issue is cutting too low too early, which removes most of the growing points before roots are strong. Let it grow longer before your first trim, then start harvesting gradually.
How do I protect potted durva during cooler months or winter nights?
In climates where nights drop below about 10°C, growth will slow or dormancy can happen. Keep the pot in the warmest available spot with as much sun as possible, reduce watering (let the top layer dry more between waterings), and avoid heavy pruning during dormancy. If frost is possible, move the pot under cover, because freezing can severely damage crowns.
Can I use yard soil or garden compost in the pot mix?
Avoid pure garden soil. It compacts in containers, reduces oxygen around roots, and holds water too long. If you want to include compost, blend it into a potting mix and keep a drainage-friendly structure, for example with coarse sand or perlite to prevent compaction.
What fertilizer should I use if I want steady growth but not excessive softness?
Use a balanced slow-release feed at planting, then switch to mild liquid feeding every few weeks during active growth. If the grass turns pale or yellow, apply a nitrogen-forward liquid feed, but do not exceed light-to-moderate rates. Overfeeding nitrogen often produces tall, soft growth that is more disease-prone and easier to mat.
How do I tell whether yellow durva is nitrogen deficiency or root stress?
If roots are white or pale, yellowing is more likely nutrient-related, especially during active warm growth. If roots are brown, mushy, or smell off, it indicates root stress from excess moisture. Also check watering consistency, because “yellow after frequent watering” often points to rot rather than lack of fertilizer.
How can I prevent fungal issues like dollar spot in a pot?
Improve airflow by cutting at proper intervals (avoid waiting too long between trims) and water earlier in the day so blades dry before night. Also ensure the potting mix drains well and the foliage is not staying wet for extended periods. If you see patchy tan areas with early-morning fuzz, immediately adjust watering frequency and timing before treating.
Do I need to remove stolons or let them spread across the whole pot?
Let them spread. Stolons are how durva fills in and forms a dense mat. In early weeks, gently press runners into contact with soil and avoid disturbing them. Once the pot is full, regular light trimming helps keep the density and prevents a messy, overly long thatch.
When harvesting, is it okay to cut multiple times in one week?
It depends on how tall the grass is and how warm the weather is. After a light harvest, new growth may show within a few days in warm months, but the grass usually needs about 2 to 3 weeks to be ready for the next cut. If you harvest again too soon, you risk slow regrowth and stress.
Why did my seeds fail even though I kept the pot moist?
Two common issues are temperature and moisture consistency. Durva seeds often stall if nighttime temperatures are too cool, and they also fail if the surface dries even briefly during the 7 to 14 day window. Keep the pot warm and maintain steady moisture, but do not flood, because saturated soil can also reduce germination.
Is bottom watering safe for durva seed germination?
Yes, it can help with even moisture for seed germination. Use bottom watering only long enough to re-wet the root zone, then let excess drain fully. Never leave the pot sitting in a water-filled tray, especially once seedlings appear, because constant saturation increases damping-off risk.
How do I know when it is time to repot or refresh the potting mix?
Refresh when you see slower spread despite proper sun and watering, or when the soil becomes very dense and holds water too long. A practical check is to water, then observe how quickly water drains and how easily roots penetrate. In many cases, replacing the top few centimeters in spring is enough, but full repotting is better if growth stalls for a full season.