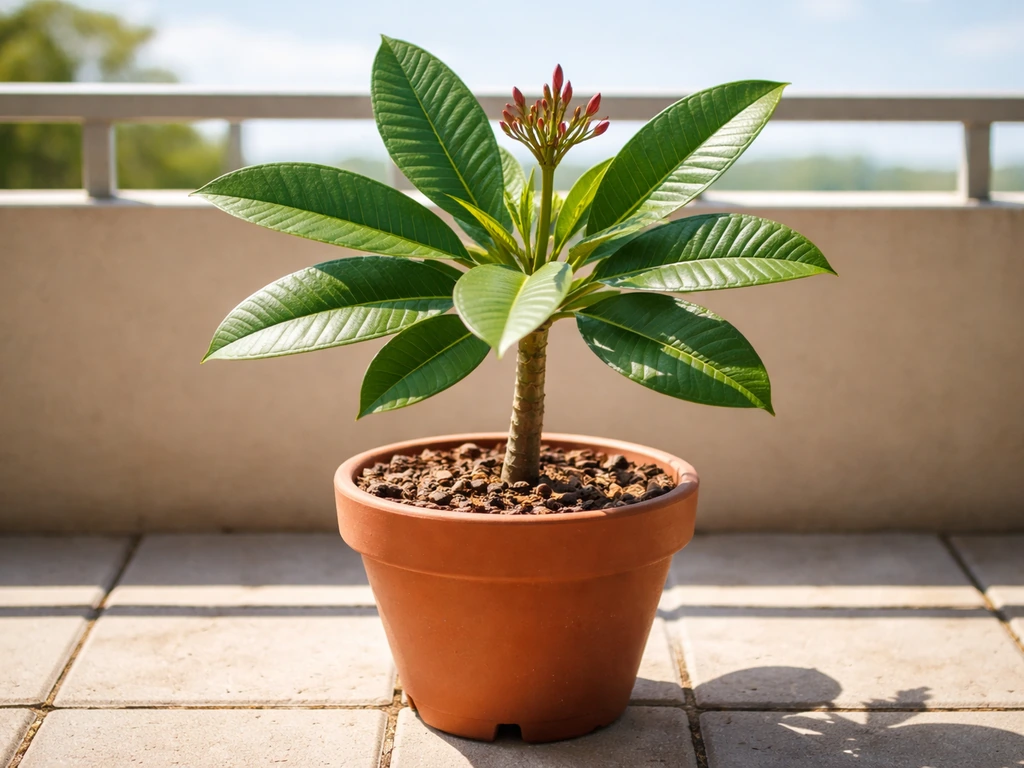
You can absolutely grow plumeria in a pot, and it does surprisingly well in containers as long as you nail two things: drainage and sunshine. Use a fast-draining mix, give it a pot with good drainage holes, park it in full sun, and you'll have a flowering plumeria on your patio or balcony within a season or two. The biggest mistake people make is treating it like a regular houseplant that likes moist soil. Plumeria wants to dry out between waterings. Get that right and most of the other problems sort themselves out.
How to Grow Plumeria in Pots: Step-by-Step Care Guide

Marcus Whitley
24 Apr 2026
Choosing the right pot and container setup
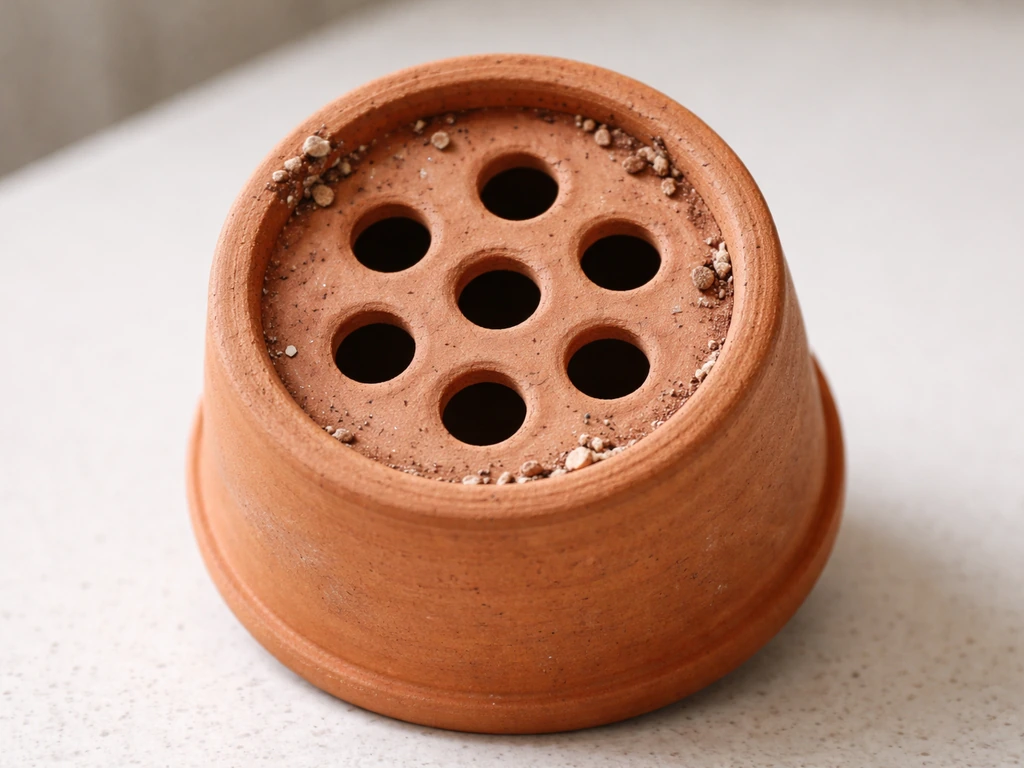
Start with a pot that has at least one large drainage hole at the bottom, and if you can find one with multiple holes, even better. Plumeria roots sitting in waterlogged soil is the number one reason these plants fail in containers, so drainage is non-negotiable. A 10 to 14-inch pot works well for a new cutting or a young plant. Once the plant has been growing for a year or two and the roots start circling the bottom, step up to something in the 16 to 20-inch range. A guide notes a minimum container diameter around 30, 40 cm for plumeria, with larger sizing as the plant matures step up to something in the 16 to 20-inch range. You don't want to go too large too soon because a huge pot holds more moisture than the roots can use, which raises the rot risk.
For material, terracotta is genuinely one of the best choices for plumeria. It's porous, so it breathes and dries out faster between waterings, which is exactly what you want. The downside is weight, especially once you fill it with a gritty mix, so if you're on a balcony or need to move the pot indoors for winter, a lightweight plastic pot with plenty of drainage holes is a reasonable compromise. Avoid glazed ceramic pots unless they have excellent drainage, because they hold moisture longer and can trick you into thinking the soil is dry on the surface when it's still damp deeper down.
One practical tip: place your pot on pot feet or small risers so it's lifted slightly off the ground or saucer. This keeps the drainage holes clear and stops the pot from sitting in a puddle after heavy rain. If you use a saucer, empty it after watering. A plumeria sitting in standing water overnight is asking for trouble.
Best soil mix and drainage for potted plumeria
This is where most people go wrong. Plumeria absolutely cannot live in regular potting soil on its own. Standard potting mixes are designed to stay moist and retain water, which is the opposite of what plumeria needs. What you want is a mix that drains fast, dries out reasonably quickly between waterings, and has enough air pockets around the roots to prevent suffocation. Think of it more like a cactus or succulent mix than a vegetable garden mix.
A solid starting mix is two parts coarse perlite to one part potting soil, or you can use a ready-made cactus and succulent mix straight out of the bag. Perlite is the white, lightweight volcanic material you see in potting mixes. It's brilliant for aeration and helps the pot cycle from wet to damp to dry faster, which is exactly the rhythm plumeria roots like. Pumice is another excellent addition, especially in the lower third of the pot where waterlogging tends to start. It's denser than perlite, settles lower, and helps water move through and out of the drainage holes. A mix of potting soil, perlite, and pumice in roughly equal parts is hard to beat for container plumeria.
Before filling the pot, you can place a piece of mesh or a coffee filter over the drainage holes to stop soil washing out, but skip the layer of gravel or rocks at the bottom. Despite common advice, that layer actually creates a perched water table that keeps moisture higher in the pot. Just use your gritty mix all the way through.
Planting method: cuttings vs seedlings, depth and spacing
Starting from a cutting
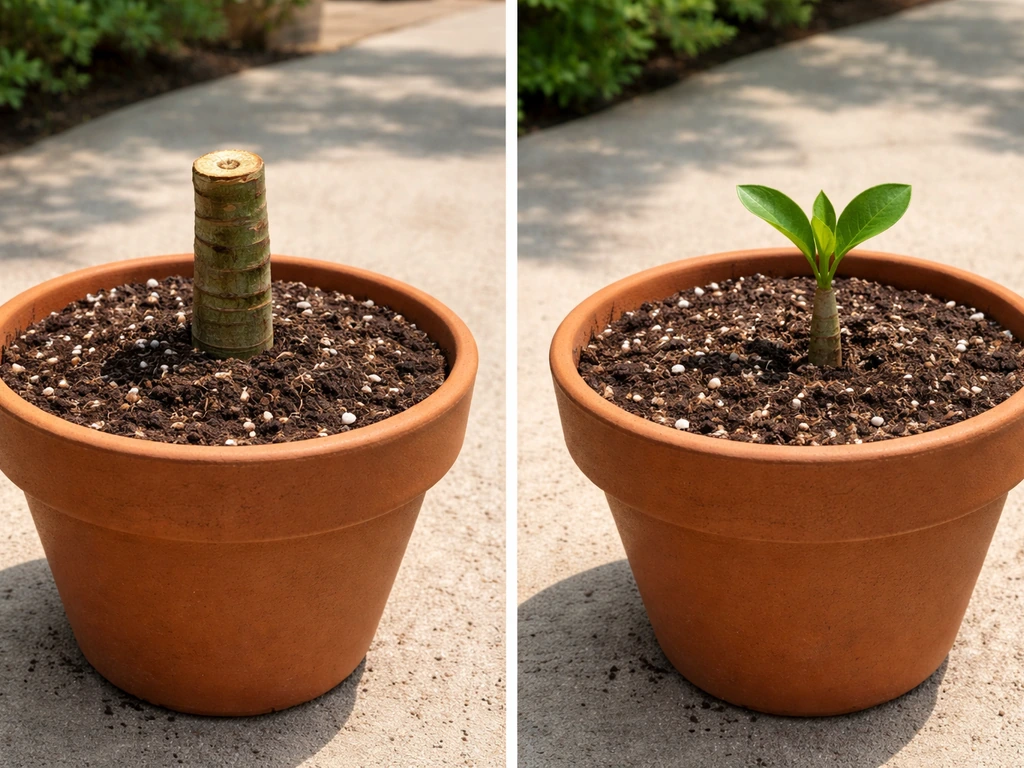
Cuttings are the most popular way to start plumeria in pots, and for good reason: they root relatively easily, and if you get a cutting from a named variety, you know exactly what flower color and fragrance you're getting. Take or buy a cutting that's at least 12 inches long and let it sit in a dry, shaded spot for a week to ten days before planting. This drying step lets the cut end callous over, which dramatically reduces the chance of rot once it's in the soil. Don't skip this step.
When the end is calloused (it should feel firm and dry to the touch), plant the cutting about 2 to 3 inches deep in your prepared mix. Some people dust the cut end with rooting hormone powder first, which can speed things up, but it's not essential. The cutting doesn't need water for the first week after planting. After that, water lightly once, then leave it alone until you see the first signs of new leaves pushing out, which tells you roots have established. This takes anywhere from 4 to 8 weeks depending on the temperature.
Starting from a seedling or established plant
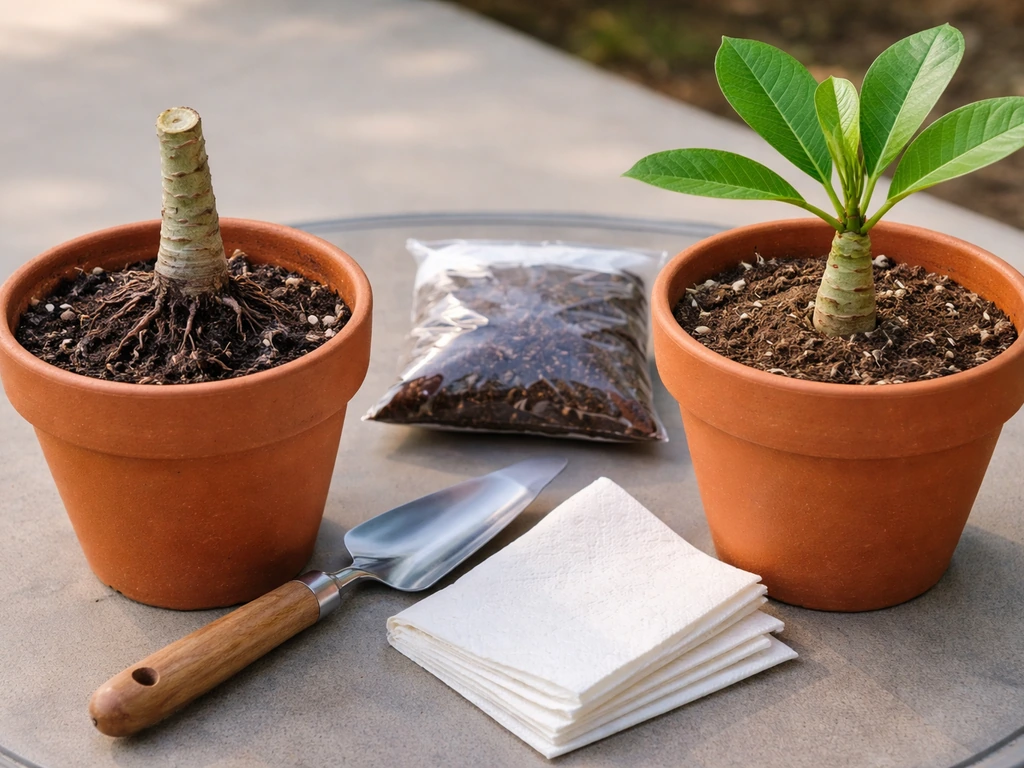
If you're buying a small potted plumeria from a nursery or transplanting an established seedling, the process is gentler. Ease the plant out of its nursery pot, shake off any soil that's not your preferred gritty mix, and repot it at the same depth it was growing before. Don't bury the base of the trunk (the caudex) deeper than it was originally sitting. Planting too deep encourages rot right at the crown, which is one of the most common container mistakes. The top of the root ball should sit about an inch below the rim of the pot to make watering easier.
Light, heat, and watering schedule in containers
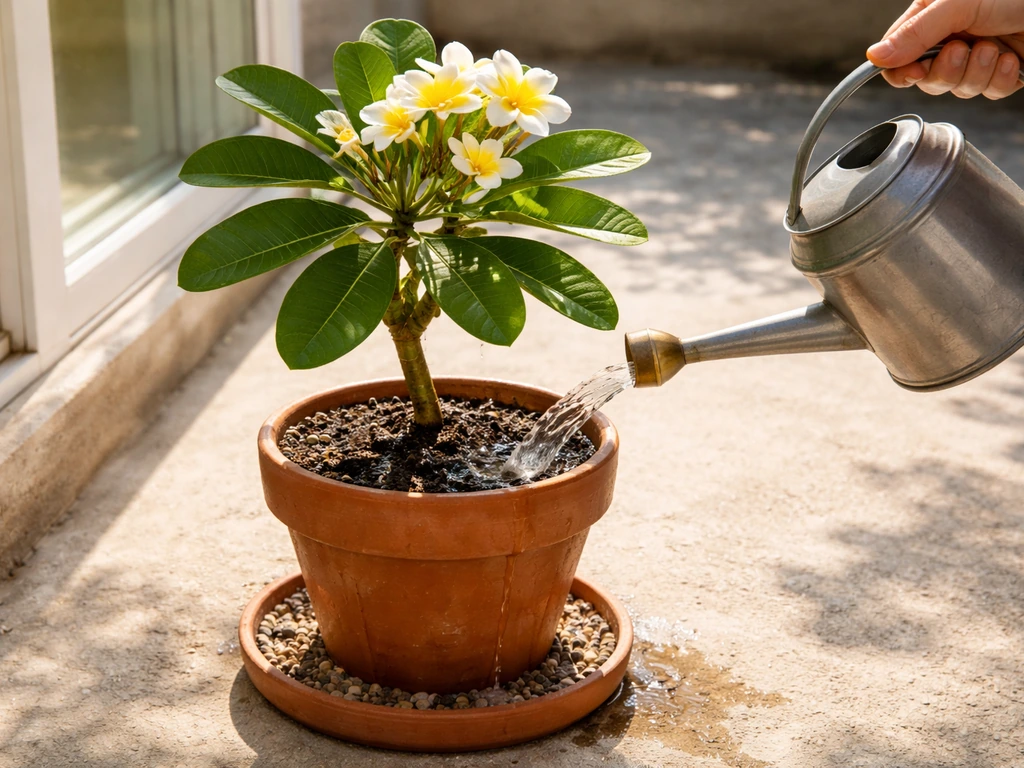
Plumeria is a sun worshipper. It needs a minimum of 6 hours of direct sunlight per day to grow well, and honestly, 8 hours or more is better if you want flowers. A south-facing or west-facing spot on a patio, balcony, or in a garden is ideal. If you're growing indoors near a window, be realistic: most indoor spots don't give enough direct light for reliable blooming, though a very bright south-facing window can work for keeping the plant alive through winter dormancy.
Heat matters too. Plumeria loves warmth and actively grows when temperatures are consistently above 60°F (16°C). Below that, growth slows significantly. Above 80°F (27°C) with full sun is when it really takes off. If you're in a cooler climate, concentrate your plumeria's outdoor season on the warmest months and prioritize the hottest spot you have.
Watering is where a lot of growers overcorrect. The schedule shifts with the season. Poinsettias also do best in a pot when you manage light and watering carefully to prevent root problems. During active growth in spring and summer, water thoroughly when the top 2 inches of the mix feel dry, then let it drain completely. In hot weather, that might mean watering every 5 to 7 days. In cooler or cloudy stretches, it might be every 10 to 14 days. The key is always checking the soil first rather than following a fixed calendar. Push a finger into the mix: if it feels damp at 2 inches deep, wait. If it feels dry and the pot feels light when you lift it, it's time to water. In autumn as the plant starts to slow down, cut watering back significantly. During dormancy in winter, water only enough to keep the roots from desiccating, roughly once every three to four weeks at most.
Fertilizing and encouraging blooms
Plumeria is a heavy feeder when it's actively growing, and in a container it relies entirely on you for nutrients because the limited soil volume depletes quickly. The key is to use a fertilizer with high phosphorus (the middle number on the fertilizer label) relative to nitrogen. High nitrogen feeds leafy growth but can actually delay or reduce flowering. Look for a fertilizer labeled something like 10-30-10 or a dedicated "plumeria fertilizer" or "bloom booster" formula. You'll also want one that includes micronutrients, especially magnesium and iron, which plumeria uses heavily.
Start fertilizing in spring once you see new growth emerging, and continue through summer, roughly every two weeks with a liquid fertilizer or once a month with a slow-release granular formula. Stop fertilizing about six weeks before your first expected frost date or when nighttime temperatures start dropping below 60°F consistently. Fertilizing late in the season pushes new tender growth right before cold weather arrives, which can damage the plant.
One thing that trips people up: a plumeria grown from a cutting typically needs two to three growing seasons before it blooms. Seedlings can take even longer, sometimes five or more years. If your plant is young and not blooming, that's completely normal. Keep the feeding and sun routine consistent and it will flower in its own time.
Seasonal care, overwintering, and dormancy handling
One of the great advantages of growing plumeria in a pot rather than in the ground is that you can bring it inside when cold weather hits. Plumeria is tropical and cannot survive frost. Once temperatures start dropping toward 40°F (4°C), it's time to act.
In autumn, as daylight shortens and temperatures cool, your plumeria will naturally start to go dormant. Leaves turn yellow and drop, which looks alarming the first time you see it but is completely normal. This is the plant conserving energy, not dying. At this stage, stop watering almost entirely and stop all fertilizing. If you're in a frost-prone climate, move the pot to a garage, shed, or indoor space before the first frost. The plant doesn't need much light during dormancy since it has no leaves, but it does need to stay above freezing, ideally above 40°F.
During dormancy, water just enough to prevent the roots and caudex from shriveling. Once every three to four weeks, give the pot a small amount of water and then leave it. In late winter or early spring, as temperatures start to rise and daylight lengthens, move the pot to a bright warm spot and begin watering more regularly again. New growth tips will start to push out within a few weeks, signaling that the plant is waking up. That's when you can start fertilizing again.
If you're in a warm climate where temperatures stay above 50°F year-round, your plumeria may not go fully dormant, or it may only partially drop its leaves. In that case, just ease back on watering and feeding during the cooler months rather than stopping completely.
Common problems in pots and quick fixes
Most problems with container plumeria come back to either too much water or too little sun. Here's a breakdown of what you're likely to encounter and what to do about it.
| Problem | Likely Cause | Quick Fix |
|---|---|---|
| Soft, mushy stem base or roots | Root or crown rot from overwatering or poor drainage | Remove from pot, cut away all rotten tissue to clean firm wood, dust with sulfur powder or cinnamon, let dry 3-5 days, repot in fresh gritty mix |
| Leaves yellowing and dropping in growing season | Overwatering, nutrient deficiency, or natural dormancy trigger | Check soil moisture before watering; test for magnesium deficiency with Epsom salt foliar spray (1 tbsp per gallon) |
| No blooms despite healthy growth | Too much nitrogen, insufficient light, or plant too young | Switch to high-phosphorus fertilizer, move to a sunnier spot, accept that cuttings need 2-3 seasons |
| Leaves drooping and wrinkling | Underwatering, especially in heat | Water deeply and thoroughly; check that water is actually reaching roots and not just running down the inside of the pot |
| White cottony clusters on stems or leaf joints | Mealybugs | Wipe off with a cotton swab dipped in rubbing alcohol; follow up with neem oil spray weekly for 3-4 weeks |
| Spider mites (fine webbing, stippled leaves) | Hot, dry conditions with poor air circulation | Blast leaves with a strong stream of water; apply neem oil or insecticidal soap every 5-7 days |
| Leggy, weak stems with few leaves | Insufficient light | Move to full sun immediately; rotate the pot every week or two so all sides get even exposure |
One reassuring thing to keep in mind: plumeria is actually a pretty resilient plant once established. If you catch a problem early, whether that's rot, pests, or nutrient deficiency, it usually responds well to correction. The stem can look completely bare and desiccated during dormancy and still come roaring back in spring. If the caudex (the swollen base of the stem) still feels firm when you squeeze it gently, the plant is almost certainly still alive. Don't give up on it too quickly.
Growing plumeria in pots shares a lot of logic with other tropical container plants. If you've grown anthurium or frangipani in pots before, you'll recognize the same principle of balancing moisture and drainage. If you want to expand beyond plumeria, this guide on how to grow hippeastrums in pots will help you get bigger blooms with the right bulbs, light, and watering schedule other tropical container plants. If you want a related bulb-in-containers project next, you can also use the same pot-and-water drainage logic when learning how to grow hyacinth bulbs in pots bulbs,. Grape hyacinths are much easier in containers when you use a well-draining mix and place the pot in bright sun how to grow grape hyacinth in pots. Anthuriums in pots also need a fast-draining mix and careful watering so the roots never sit in soggy soil. Plumeria is similarly rewarding once you find its rhythm, and having it in a movable container gives you control over its environment that you simply don't get when it's planted in the ground. If you want a different flowering shrub, the same container principles apply when you learn how to grow hydrangea in pots.
FAQ
Can I keep my potted plumeria growing year-round indoors, or does it need true dormancy?
Yes, but aim for a “bright, dry” setup. During dormancy it is fine if the caudex and roots are kept just barely from shriveling, but do not keep the pot in warm, actively-lit conditions like summer. If you keep it too warm and water regularly through winter, you can force weak growth and reduce flowering later.
My plumeria dropped all its leaves, how do I tell if it is normal dormancy or rot?
The fastest clue is the feel of the caudex and stem. If the caudex is still firm, it is likely alive, even if leaves are gone. If it feels mushy or hollow and the pot stays wet, that points to rot, and you should stop watering immediately, improve drainage, and check the roots (repotting into fresh gritty mix if necessary).
What pot size is too big, and how can I tell if my plumeria is suffering from an oversized container?
Over-potting often shows up as slower drying, persistent dampness, and a lack of flowering. If your pot is much larger than the root mass, moisture can linger even when you think you watered “correctly.” A practical fix is to move up gradually, or if you suspect excess moisture, check drainage speed after watering and consider repotting into an appropriately sized container with a grittier mix.
My soil surface dries fast but leaves are yellowing, what does that usually mean?
If the top looks dry but the soil deeper down is still damp, that usually means the mix is holding too much water or the pot is sitting in a saucer. Use the finger test at about 2 inches deep, and also lift the pot to judge weight. You can also improve “drying rhythm” by increasing perlite and pumice proportion rather than simply watering less.
Why do some plumeria cuttings rot after planting, and what should I do if it happens?
If the cutting is not calloused before planting, it can rot before it ever roots. A safe target is a firm, dry, calloused cut end (not soft or wet). If it already rotted, look for a mushy stem end or a foul smell, then cut back to healthy tissue, let it callous again, and replant in a drier, airier mix.
How can I tell whether yellow leaves are from overwatering, underfeeding, or cold stress?
Start fertilizing when you see consistent new growth, then feed lightly at first. A common mistake is fertilizing late in the season, which can trigger tender growth that gets damaged by cold. If leaves yellow while it is actively growing, check that you are using a phosphorus-forward fertilizer and that your mix and watering are not keeping roots waterlogged.
Can I move my potted plumeria indoors just for cold nights, and will it still bloom?
You can, but only if your balcony placement still gives enough direct sun. Plumeria needs strong light, and indoor “filtered sun” often results in leggy growth and no blooms. If bringing it inside is unavoidable, place it by a very bright south-facing window, reduce watering during lower light periods, and expect reduced flowering until light levels improve.
How much water should I give during winter dormancy if I do not have a cool garage?
For dormancy, water sparingly enough that the caudex does not shrivel, then stop again. Instead of a strict date, judge by the caudex firmness and the pot weight. In many homes, winter air can be dry, so a small amount of water every 3 to 4 weeks can be better than either frequent soaking or total neglect.
Is it ever okay to add rocks or gravel at the bottom of the pot, and should I use a mesh over the holes?
Yes. A coffee filter or mesh over drainage holes can prevent soil loss, but do not add gravel or other filler at the bottom, because it can trap moisture. The goal is that water moves quickly through the gritty mix and out the holes, without creating a perched water zone.
What are the early signs of root rot in container plumeria, and how do I recover the plant?
Common signs include wilting after watering (roots may not be getting oxygen), slow drying, and a sour smell from the pot. If you suspect root issues, remove the plant, inspect for mushy roots, and repot into a fresh fast-draining gritty mix. Then adjust watering to only when the mix dries to about the 2-inch level.
If my plumeria is not flowering yet, what are the top reasons in pots besides it being young?
Most plumeria grown from cuttings bloom sooner than from seed, but even cuttings can take time depending on variety, pot size, and how consistent the warmth and sun are. If you are within the right growing season and still not blooming, the likely causes are insufficient direct sun, inconsistent watering that disrupts root rhythm, or not using a phosphorus-forward fertilizer during active growth.