If you searched 'how to grow hydroponic pot,' you're almost certainly looking for how to grow cannabis hydroponically indoors, and that's exactly what this guide covers. before we get into the good stuff: cannabis cultivation laws vary enormously by location. In some U.S. states, home growing is fully legal for adults. Following the rules isn't just about avoiding trouble, it's the foundation of a responsible grow. With that said, if you're in a place where growing at home is legal for you, hydroponics is one of the most rewarding and efficient ways to do it. how to grow money plant in pot. how to grow the best pot plants
How to Grow Hydroponic Pot: Step-by-Step Indoor Guide
Marcus Whitley
24 Mar 2026
Hydroponic cannabis means growing without soil, delivering nutrients directly to roots through water, and it can be a great way to learn how to grow a potted garden with containers and water-based nutrition. Plants grown this way tend to grow faster, yield more per square foot, and give you precise control over what your plants eat and drink. That control is exactly what makes hydroponics so appealing, and also what trips up beginners who don't know the parameters to aim for. This guide walks you through every stage, from picking a system to jarring up your final harvest.
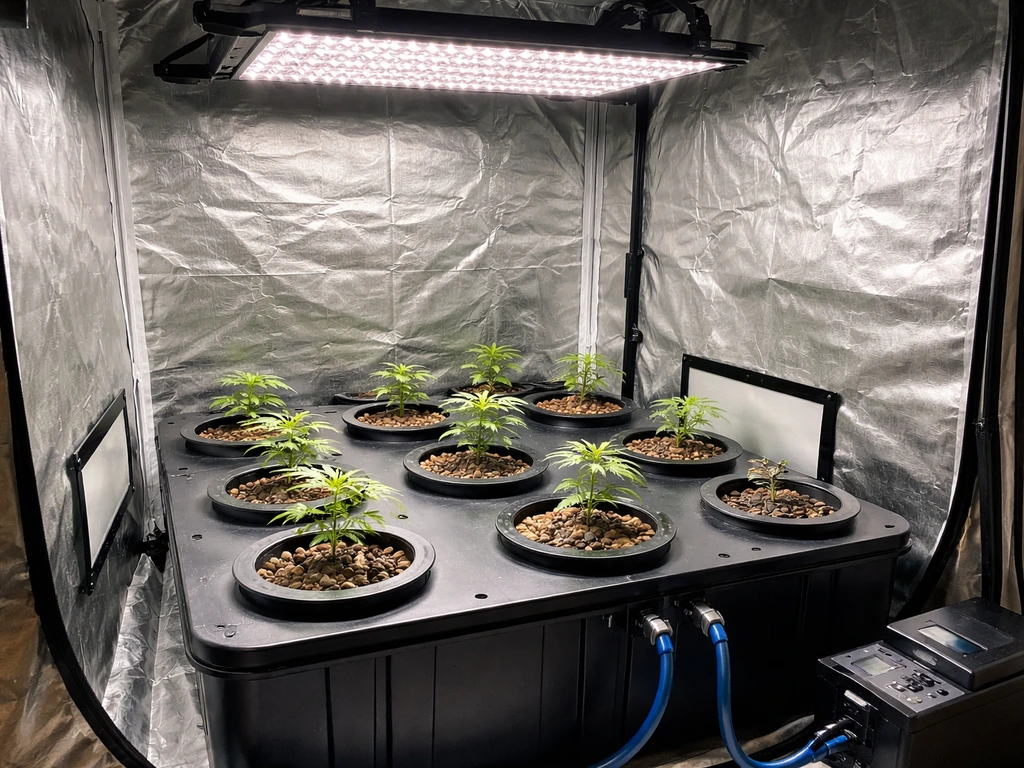
Choosing a Hydroponic Setup That Actually Fits Your Space
There's no single 'best' hydroponic system for cannabis. The right choice depends on your space, budget, and how much hands-on time you want to spend. Here's an honest breakdown of the four most beginner-relevant systems:
| System | How It Works | Best For | Main Downside |
|---|---|---|---|
| DWC (Deep Water Culture) | Roots hang in aerated, nutrient-rich water 24/7 | Beginners wanting fast growth in a single container | Root rot risk if air pump fails even briefly |
| Kratky | Passive version of DWC — no pump, roots grow into still water with an air gap | Absolute beginners, low-budget, minimal equipment | Less forgiving in late flower; needs monitoring |
| NFT (Nutrient Film Technique) | A thin stream of nutrient solution flows continuously over roots in channels | Multi-plant setups, experienced growers | Roots dry out fast if pump fails; more complex plumbing |
| RDWC (Recirculating DWC) | Multiple buckets connected, water recirculates from a central reservoir | Growers scaling up past 2-4 plants | Higher cost and more parts to troubleshoot |
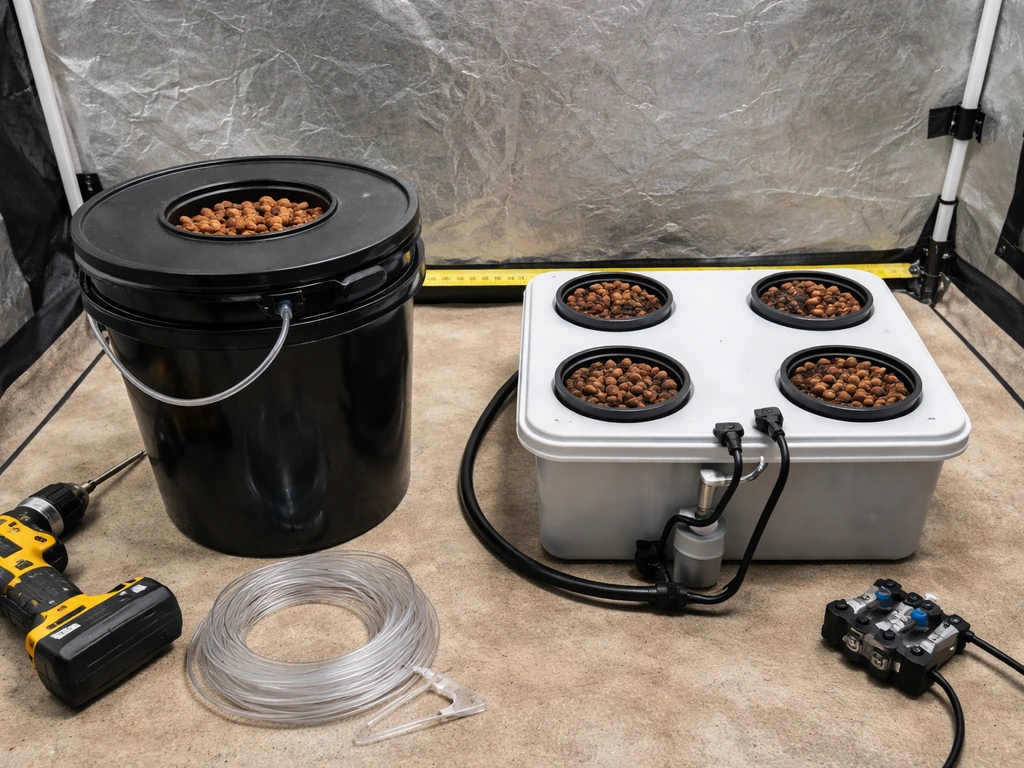
My honest recommendation for a first home cannabis grow: start with DWC. A single 5-gallon bucket, a small air pump, an air stone, and a net pot lid is all you need. You can pick up a complete kit for under $50, and the learning curve is manageable. Kratky works too and is even simpler, but it requires more frequent top-offs in late flower when plants are drinking heavily. NFT and RDWC are better once you've got a grow or two under your belt and want to run more plants efficiently.
On the legal side: home cultivation plant limits are real and enforced. For example, Washington State's cannabis statutes under RCW Title 69 tie home growing rights to medical authorization frameworks, and proposed legislation like SB 6204 (2025-26) would define adult plant limits and penalties for exceeding them. Whatever your state allows, don't exceed plant count limits, and keep records if you're growing under a medical authorization. When in doubt, fewer plants managed well beats more plants that cause legal or practical headaches.
What Your Plants Actually Need in Hydroponics
Soil acts as a buffer, it holds nutrients and moisture and forgives mistakes for days at a time. Hydroponics doesn't buffer. When something is off, plants show it within 24-48 hours. That's the trade-off for faster growth and more control. Here's what you're managing at all times:
Light
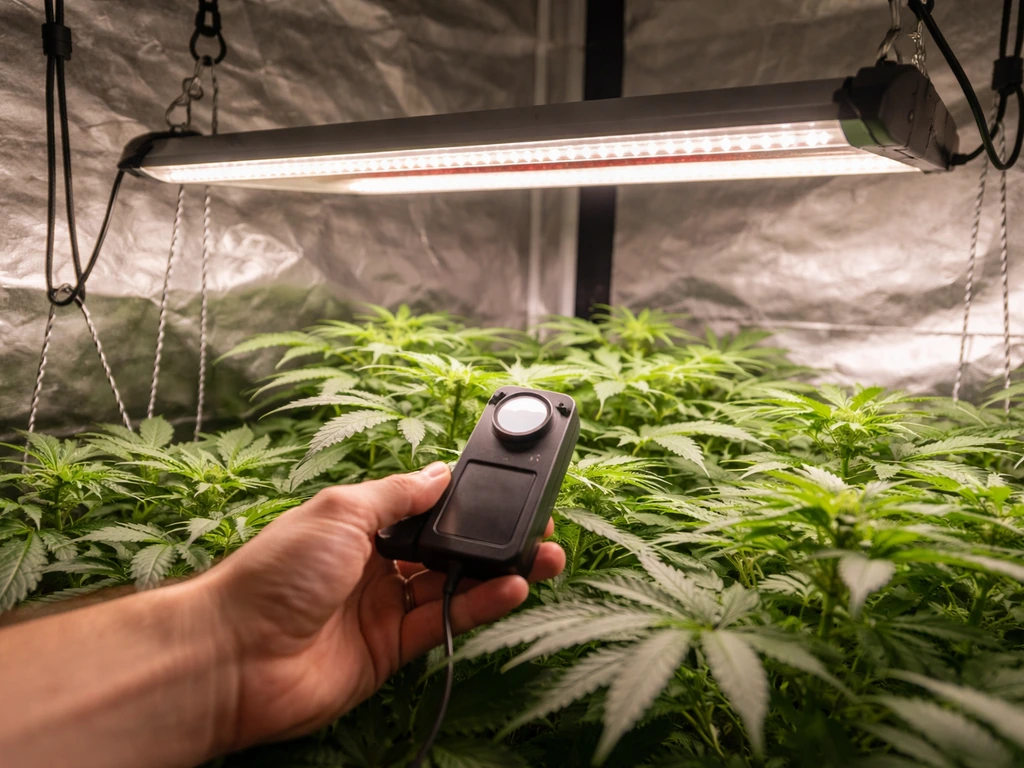
Cannabis is a high-light plant. For vegetative growth, aim for 400-600 PPFD (micromoles per square meter per second) at canopy level. In flower, push that up to 600-900 PPFD. LED grow lights are now the standard choice for home growers, they run cooler, use less electricity, and modern quantum board LEDs produce excellent results. A 200-240W LED is enough for a 2x2 foot space (one to two plants). A 400-480W fixture handles a 3x3 or 4x4 foot tent. Keep lights on a timer: 18 hours on, 6 hours off for veg; 12 hours on, 12 hours off to trigger and maintain flower.
pH
pH is the single most important number in hydroponic cannabis. Get this wrong and plants can't absorb nutrients no matter how much you feed them. In hydroponics, target a pH of 5.5 to 6.2, with 5.8 being the sweet spot most growers aim for. Buy a digital pH meter (a $15-20 one from Amazon works fine to start) and calibration solution. Check your reservoir pH every day, especially early on. pH drifts upward as plants eat nutrients, so you'll be adjusting down more often than up. pH Up and pH Down solutions are cheap and last a long time.
EC and PPM (Nutrient Strength)

EC (electrical conductivity) and PPM (parts per million) both measure how strong your nutrient solution is. Think of it as measuring how salty the water is for your plants. Too low and plants starve; too high and the roots get chemical burn. In early veg, target 400-700 PPM (using the 500 scale) or 0.8-1.4 EC. Mid-to-late veg pushes to 700-1000 PPM / 1.4-2.0 EC. Flowering can go up to 1000-1400 PPM / 2.0-2.8 EC at peak, then drop back down in the final two weeks (called a flush). A cheap combo pH/EC/TDS meter runs about $20 and is worth having. Measure before adding solution to the reservoir, and keep a log.
Water Temperature and Oxygen
Keep your reservoir water between 65-72°F (18-22°C). Warm water holds less dissolved oxygen and creates perfect conditions for root rot. Cold water slows nutrient uptake. Your air pump and air stones keep oxygen in the water, never let them run for less than 18 hours a day, and in a DWC setup, ideally run them 24/7. Replace reservoir water completely every 7-10 days to prevent salt buildup and microbial growth.
Temperature and Humidity
Canopy air temperature should stay between 70-85°F (21-29°C) with lights on, and can drop 5-10°F with lights off. Humidity targets shift by stage: seedlings and early veg do well at 60-70% relative humidity (RH), mid-veg at 50-60%, and flowering should come down to 40-50% RH, dropping further to 35-45% in late flower to protect developing buds from mold. A small digital thermometer/hygrometer combo is essential. If you're growing in a tent, a clip fan for canopy airflow and an inline exhaust fan with a carbon filter for odor management cover most environmental needs.
Starting From Seeds or Clones
Seeds and clones are both valid starting points. Seeds give you a clean genetic slate with no diseases carried over from a mother plant, but they take 5-10 days to germinate and another 1-2 weeks before they're ready to go into a hydroponic system. Clones skip germination and can go into the system faster, but you need a reliable source, a friend's mother plant or a licensed dispensary in states that allow clone sales.
Germinating Seeds
- Soak seeds in a glass of plain pH-adjusted water (6.0 pH) for 12-24 hours until they sink or show a small tail (taproot).
- Transfer to a folded damp paper towel inside a plastic bag or between two plates. Keep in a dark, warm spot — around 75-80°F.
- Check every 12 hours. Once the taproot is 0.5-1 cm long, the seed is ready to plant.
- Place the seed taproot-down into a small rockwool cube or rapid rooter plug moistened with pH 5.8 water. Cover lightly and keep humid.
- Use a dome or plastic wrap to hold humidity at 70%+ until the seedling pops and shows its first leaves (cotyledons).
Transplanting Into Your Hydroponic System
Wait until your seedling has developed its first set of true leaves (the first serrated cannabis leaves beyond the round cotyledons) and shows white roots emerging from the bottom of the rockwool or plug. This usually takes 10-14 days from germination. At that point, set the plug directly into a net pot filled with clay pebbles (hydroton), and lower it into your DWC bucket or system. Make sure the bottom of the net pot is just touching or slightly above the waterline, the roots will grow down into the nutrient solution on their own. Start with a light nutrient solution: 400-500 PPM at pH 5.8.
For clones: get them into a rapid rooter or rockwool, mist with plain pH-adjusted water, and keep under low light (a T5 fluorescent or LED set to low) at high humidity (75-80% RH) until roots appear from the plug. Once rooted, treat them exactly like a seedling ready for transplant.
Managing Vegetative Growth and Training Your Plants
Vegetative stage is when plants build their structure, all the branches and nodes that will eventually hold flowers. In hydroponics, veg can be surprisingly fast: plants under 18 hours of light with well-managed nutrients can double in size every 7-10 days. Most home growers run veg for 3-6 weeks depending on how much vertical space they have. Remember, plants typically double or triple in height during the flowering stretch, so don't veg until they're already touching your lights.
Training Techniques for Small Spaces
Training is how you get more bud sites without growing a taller plant. The two most useful techniques for home growers are LST (low-stress training) and topping. LST means gently bending the main stem and tying it down horizontally with soft wire or plant clips, which encourages the side branches to grow upward and creates an even canopy. Topping means cutting the main growing tip (the apical meristem) above a node, which causes the plant to split into two main colas instead of one. Do this once or twice during veg, not in the final week before flipping to flower.
Spacing matters too. In a 2x2 foot tent, one well-trained plant is genuinely enough. In a 4x4, four plants with modest training or two heavily trained plants works well. Overcrowding cuts airflow, raises humidity at the canopy, and invites mold and pests. Give each plant real room to breathe.
Defoliation (removing fan leaves) is a topic that divides growers. My practical take: in veg, don't strip leaves aggressively. Remove leaves that are yellowing, blocking light from lower bud sites, or pressing against other plants. In early flower, a modest defoliation around day 21 (three weeks after flipping to 12/12) can improve airflow through a dense canopy. Don't go overboard, leaves are solar panels, and removing too many slows growth and stresses the plant.
Flowering Stage: Timing, Environment, and What to Expect
Flowering is triggered by changing your light schedule to 12 hours on, 12 hours off. This mimics the shortening days of late summer and tells the plant to switch from growth to reproduction. Most photoperiod cannabis strains flower for 8-12 weeks depending on genetics. Autoflowering strains are different, they flower based on age, not light schedule, and typically finish in 8-10 weeks from seed regardless of your light timing. Autos are a popular choice for beginners because they're forgiving and faster.
In the first two weeks after flipping to 12/12, you'll see the 'stretch', plants can grow 50-100% taller in this period. Be ready to raise your lights and continue light LST to keep the canopy even. Around week 3-4, bud sites will become obvious and start stacking. From week 5 onward, buds fatten. Terpene production (smell) increases noticeably from week 6 onward, this is when a carbon filter earns its place in your setup.
Keep humidity at 40-50% RH through most of flower, dropping to 35-45% in the final 2-3 weeks. Late-flower humidity above 55% is asking for bud rot (Botrytis), which can destroy an entire harvest in days. Temperature swings between lights-on and lights-off periods of 5-10°F can actually enhance terpene and color development in some strains, a trick worth trying once you've got baseline grows under your belt.
In the final 10-14 days before harvest, most growers run a 'flush', plain pH-adjusted water with no nutrients, or a very low PPM solution (100-200 PPM). The goal is to clear excess salts from the root zone and improve the final taste of the flower. Some growers swear by it; others use a gradual nutrient taper instead. Either works; what matters is not feeding at full strength right up to harvest day.
Troubleshooting the Most Common Hydroponic Problems
Hydroponic cannabis is fast and rewarding, but when things go wrong they go wrong quickly. These are the failures I see most often and how to fix them.
Root Rot
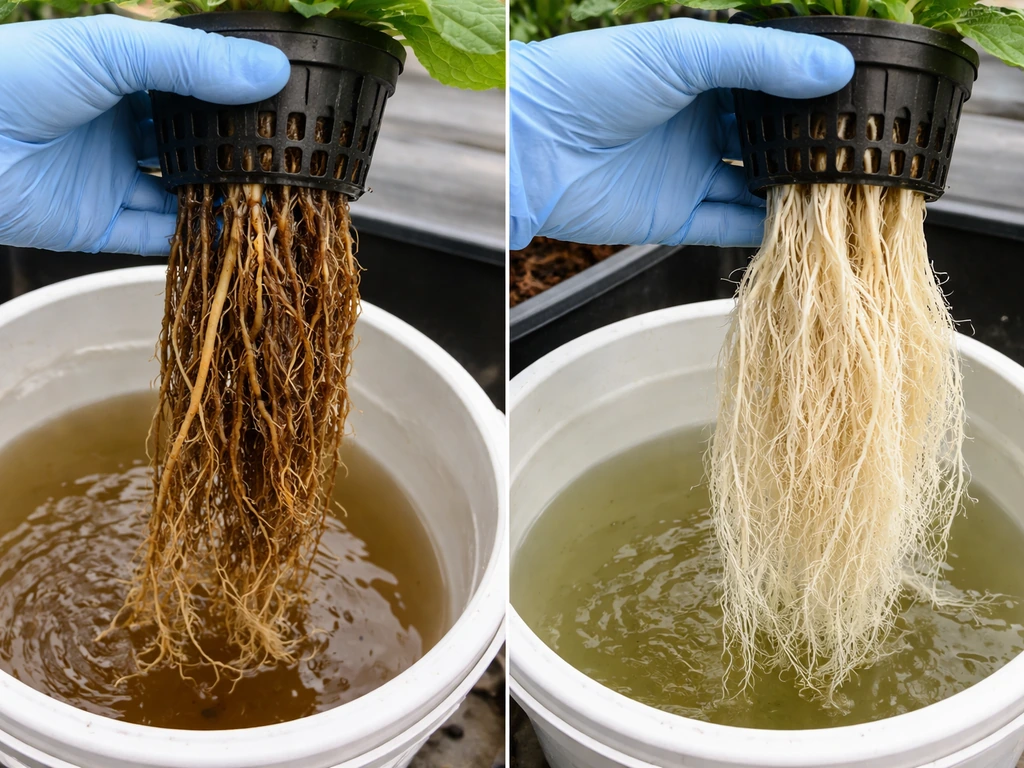
Root rot looks like slimy, brown, foul-smelling roots (healthy roots should be white and firm). It's caused by warm water, low dissolved oxygen, or opportunistic pathogens like Pythium. Fix it by: lowering reservoir temp to below 72°F, confirming your air pump is running and air stones aren't clogged, doing a full reservoir change, and adding a beneficial bacteria product like Hydroguard (Bacillus amyloliquefaciens) at label rates. Hydroguard is cheap and genuinely prevents re-infection when used consistently.
Nutrient Lockout
Nutrient lockout is when plants show deficiency signs (yellowing leaves, purple stems, spots) even though your reservoir PPM is fine. The culprit is almost always pH being out of range. Different nutrients are absorbed at different pH windows, and if your pH drifts outside 5.5-6.2, some nutrients become chemically unavailable no matter how much is in the water. Fix: check pH first, always. Adjust to 5.8, do a full reservoir change with fresh solution, and monitor daily for a week.
Algae and Biofilm
Green or brown slime in your reservoir or on root surfaces is algae. Algae grows when light reaches your nutrient solution. Prevention is simple: use opaque buckets and lids, cover any openings with black tape or foam, and keep reservoir temps down. If you already have algae, do a full reservoir change, scrub everything with a diluted hydrogen peroxide solution (3% concentration, 1 part peroxide to 3 parts water), rinse thoroughly, and block the light source permanently.
pH Drift
pH rises as plants consume nutrients (particularly nitrogen in veg) and as water evaporates and is replaced with plain water. Check pH daily and adjust. If pH is spiking more than 0.5 units per day, your plant is eating heavily, bump up nutrients slightly or top off with nutrient solution rather than plain water. Some growers add a small buffer like potassium silicate to stabilize pH swings.
Pests, Even Indoors
The most common indoor cannabis pests are fungus gnats, spider mites, and thrips. Fungus gnats are especially common in hydro setups because they're attracted to moisture around net pots and media. Yellow sticky traps hung at canopy level catch adults and give you early warning. For gnats, diatomaceous earth (food grade) sprinkled on exposed growing media helps. For spider mites or thrips, a neem oil spray (1 tsp neem, 1 tsp dish soap, 1 quart warm water) applied to leaves in early veg or early flower is effective. Never spray in late flower, it affects taste and can encourage mold.
Harvesting, Drying, and Curing Your Buds
Harvest timing is one of the places where beginners most often cut short their results. The clearest way to judge harvest readiness is with a jeweler's loupe (30-60x magnification) or a USB microscope to look at trichomes, the tiny resin glands on buds and sugar leaves. Trichomes progress from clear (not ready) to milky white (peak THC) to amber (THC degrading to more sedating CBN). Most growers harvest when trichomes are mostly milky with 10-20% amber for a balanced effect. A secondary sign: most of the white pistil hairs on the buds should have turned orange or red, typically 70-90% of them.
Harvesting
Cut the plant at the base or harvest branch by branch. Trim large fan leaves immediately (wet trimming) or leave them on and trim after drying (dry trimming, easier for most beginners because wet trimming is sticky and time-consuming). Hang trimmed branches upside down or lay them on drying racks in a dark room at 60-65°F and 55-60% RH. This slow dry takes 7-14 days. Drying too fast (hot, dry room) destroys terpenes and produces harsh smoke. You'll know it's ready when small stems snap cleanly rather than bending.
Curing
Curing is where quality goes from good to excellent. Place dried buds loosely in wide-mouth glass mason jars, filling them about 75% full. For the first week, open the jars ('burp' them) for 15-30 minutes twice a day. This releases CO2 and moisture from the center of the buds and prevents mold. From week 2 onward, burp once daily. After 2 weeks, burp every few days. A minimum cure of 2-4 weeks dramatically improves taste and smoothness. Many experienced growers cure for 6-8 weeks and notice a significant improvement. If you smell ammonia when you open a jar, buds weren't dry enough, spread them out to dry further immediately.
Troubleshooting Low Yields
If your harvest was disappointing, the most common culprits are: insufficient light intensity during flower, harvesting too early, pH problems that limited nutrient uptake for weeks without being caught, or a genetics mismatch (some strains just yield less). A grow journal, even a simple notebook with daily pH/EC/temperature notes and weekly photos, is the fastest way to diagnose what went wrong and improve on the next run. Don't be discouraged by a smaller first harvest. Almost every grower looks back at their first grow and sees exactly what they'd do differently, and that knowledge is genuinely valuable.
One final note: the CDC and the U.S. Surgeon General have both highlighted real health risks associated with cannabis use, particularly for younger people and those who are pregnant. Growing it legally and responsibly includes being mindful of who has access to your grow and your harvest. Keep it secure, keep it legal, and grow with care.
FAQ
Do I need any specific water filtration or treatment before filling a hydroponic system?
Often yes. If your tap water has high chlorine, chloramine, or extreme hardness, nutrient lines can become unstable even when pH is correct. Let water sit 24 hours to off-gas chlorine, and for chloramine use a carbon filter or a dechlorinator. If you can, check source water EC (or TDS) and subtract that baseline when you mix nutrients.
Can I use the same nutrient solution for the whole grow, or should I change formulas?
You can’t keep one “set and forget” formula. Switch nutrient targets by stage, even if you keep the same system, because uptake rates change from veg to flower and again near the end. A practical approach is to use a veg mix until the first flowering week, then transition to a flowering formula and taper nutrients only in the final 10 to 14 days.
What do I do if my pH keeps drifting up even though I adjust daily?
Rapid upward pH drift usually means either the reservoir is getting topped off with plain water, microbes are building up, or the nutrient solution is being mixed or measured inconsistently. Make sure all top-offs use the same nutrient solution strength, fully mix nutrients before measuring, and consider a reservoir change sooner than your usual 7 to 10 day interval if you see steady, fast drift.
How do I tell the difference between nutrient deficiency and root oxygen problems?
Deficiency often looks patterned, with gradual symptoms tied to a specific element, while oxygen problems tend to show faster wilting or root discoloration. If roots smell bad, look brown or slimy, or your EC/pH behavior becomes erratic, prioritize fixing dissolved oxygen (airflow, diffuser placement, and water temperature) before changing nutrient recipes.
Is it safe to top off with water only when levels drop, or should I add nutrient solution?
Prefer nutrient solution top-offs once you are established in a steady feeding pattern. Water-only top-offs lower EC and can cause pH to behave differently, which can look like nutrient lockout. If you must use plain water, do it only when the drop is small and you plan to re-balance EC with a measured nutrient adjustment.
Do I need a chiller or heater for reservoir temperature in an indoor grow?
Not always, but it depends on your room. If your reservoir often exceeds 72°F (22°C), you may need active cooling or a lower ambient setup, because warm water increases root disease risk. If it regularly falls below mid-60s°F, a small aquarium heater can stabilize uptake, but keep temperature changes gradual.
How often should I clean tubing, air stones, and the reservoir in a DWC setup?
In addition to full reservoir changes, inspect and rinse air stones during changes, and check airline connections for clogs. If you see any cloudiness, slimy residue, or persistent odors, clean immediately rather than waiting for the next scheduled interval. Ongoing gunk can reduce oxygen transfer even when the pump is running.
What lighting should I choose if my tent size is on the edge of recommended wattage?
If you’re between sizes, it’s usually better to slightly overprovision dimmable LEDs and run at lower power than underpowered fixed output. Use your PPFD targets at canopy level, not sticker wattage, and ensure you can raise or lower the light to maintain the veg (about 400-600 PPFD) and flower (about 600-900 PPFD) ranges.
Can I grow in a hydroponic system using only nutrients from the beginning, without a seedling ramp?
It’s a common beginner mistake. Seedlings and early roots often struggle with full-strength EC, even when pH is perfect. Start the first stable period with a lighter solution (roughly the 400 to 500 PPM band mentioned for early transplants), then increase slowly over 1 to 2 weeks while monitoring for tip burn or persistent darkening.
How should I manage humidity if my room is too dry or too humid for the flower targets?
If humidity is too low, add humidity with a controlled humidifier and avoid soaking the canopy by aiming mist away from direct airflow. If it is too high, increase exhaust and airflow, verify your dehumidifier is sized correctly, and avoid letting reservoirs and wet surfaces radiate moisture near the tent intake.
What’s the best way to prevent algae without making the system less oxygenated?
Block light from reaching nutrient solution. Use opaque buckets and cover lids, and darken any light paths into the reservoir. Avoid adding UV treatments that can harm beneficial microbes you may rely on for disease prevention. Keep oxygenation high by focusing on air stone performance rather than adding light exposure control measures that reduce airflow.
Should I use beneficial bacteria or enzymes routinely, or only after problems start?
Many growers use beneficial bacteria as prevention, not emergency treatment, but consistency matters. If you introduce a product, follow label dosing exactly and maintain reservoir hygiene. If you only add it after rot appears, you may still recover, but you often need a full reset (temperature, oxygen, reservoir change, and cleaning) to stop re-infection.
How do I know whether to flush with plain water or do a nutrient taper?
Choose based on what your plant has been doing. If you had stable pH and EC and leaves stayed healthy, a controlled nutrient taper often avoids abrupt stress. If you suspect salt buildup or you’ve seen pH instability and nutrient lockout signs, plain pH-adjusted water for the final window can help reset the root zone. In both cases, keep pH adjusted and avoid extreme sudden changes.
When harvesting, do I need to stop feeding nutrients completely right away?
Not necessarily on day one, but you should ensure the final 7 to 14 days do not use full strength nutrients. Either flush or taper, but keep pH-controlled water and maintain the same reservoir temperature and oxygenation approach you’ve been using. The goal is reducing excess salts in the root zone without shocking the plant.
What should I keep in a basic grow journal to diagnose problems quickly?
Track the essentials with timestamps: reservoir pH and EC (or PPM) every adjustment day, reservoir temperature, ambient temperature and RH, and any interventions (feeding changes, topping, defoliation). Add weekly photos from the same angle. This makes it much easier to correlate symptom onset with parameter shifts, especially pH drift.