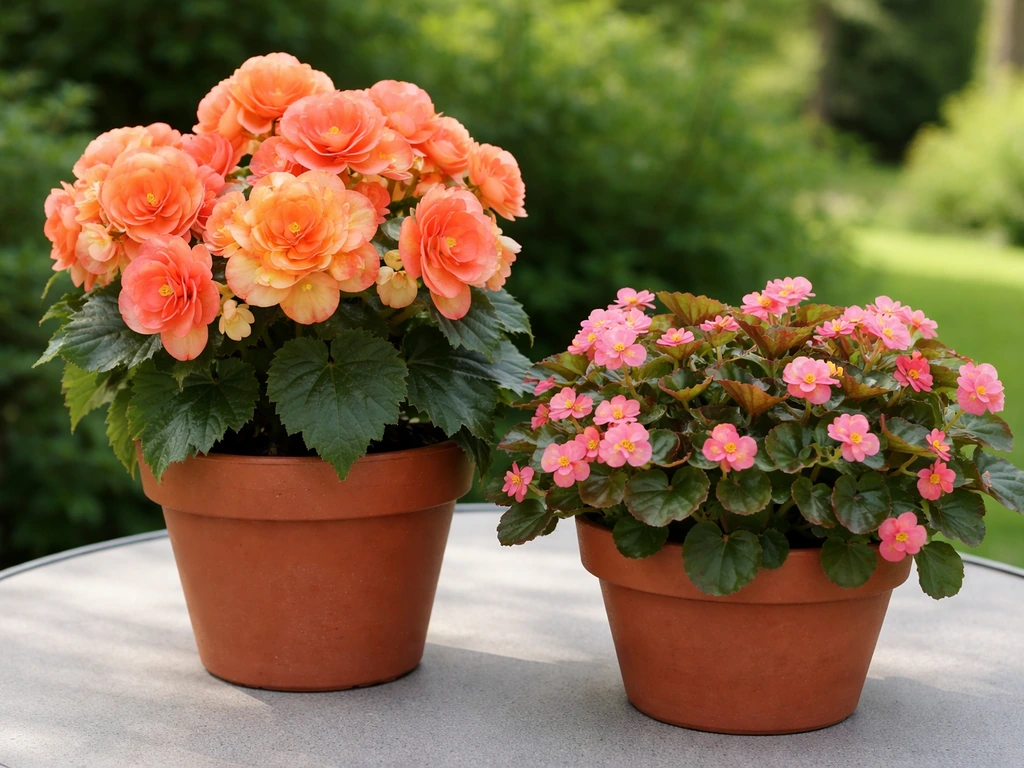
Yes, you can absolutely grow begonias in pots, and if you pick the right type and set things up correctly, they will reward you with some of the most spectacular blooms of any container plant you'll grow all season. The key is understanding that not all begonias are the same, and the tuberous types (the ones with the giant, rose-like flowers) have a few specific needs that differ from the more common wax begonias you see in every garden center. Get those details right and you're in for a treat. Get them wrong and you'll be scratching your head wondering why your pot is rotting. This guide walks you through the whole process, start to finish.
How to Grow Begonias in Pots: Tuberous Begonia Guide

Marcus Whitley
21 Apr 2026
Picking the Right Begonia Type for Your Pot
The begonia family is huge, and the type you choose genuinely changes how you care for the plant. For container growing, the two types you'll encounter most often are tuberous begonias and wax begonias, and they are quite different plants.
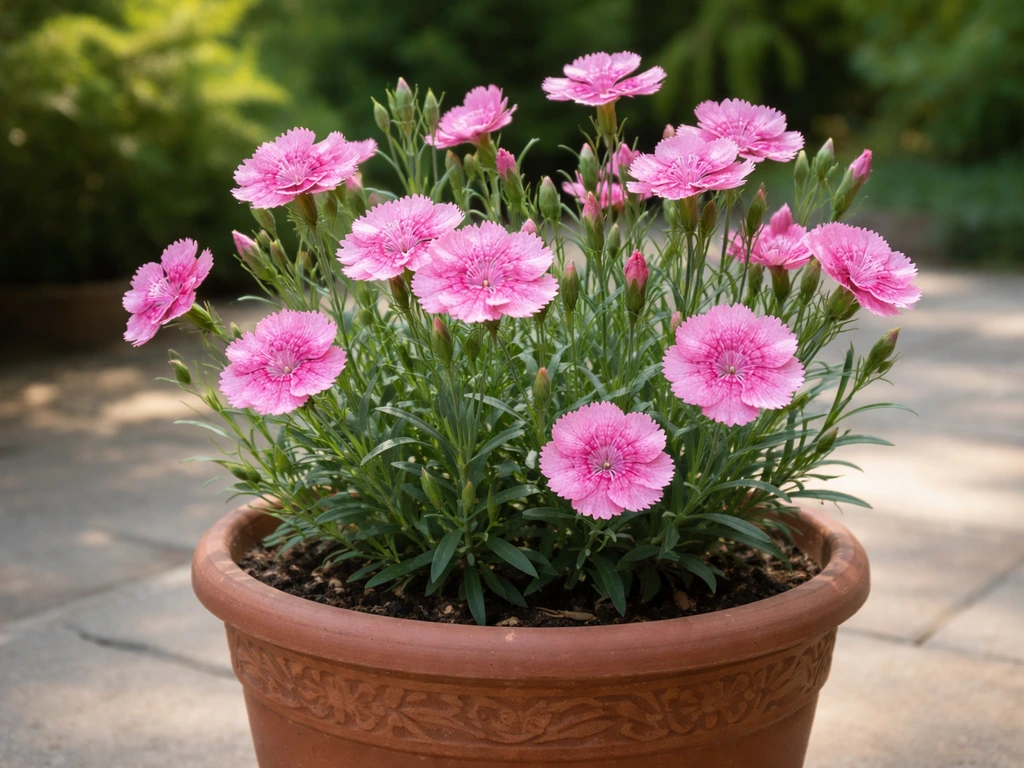
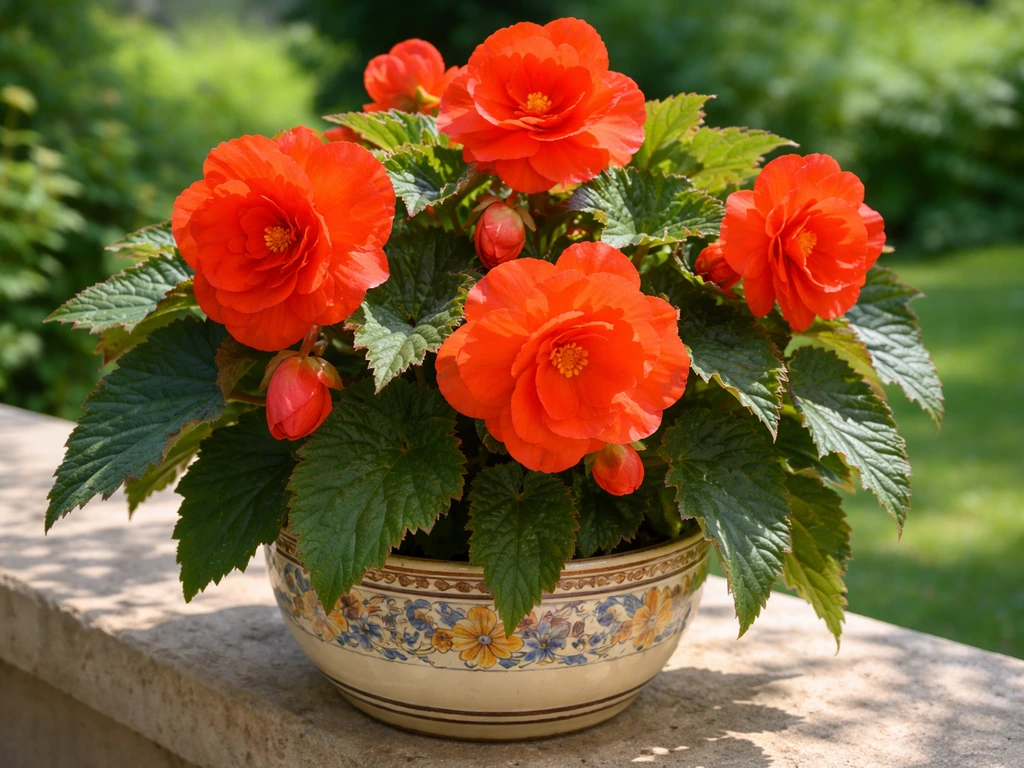
Tuberous begonias (Begonia x tuberhybrida) are the showstoppers. They grow from a tuber, much like a bulb, and produce enormous flowers in just about every color imaginable. They can reach around 18 inches tall and are genuinely among the most showy flowering plants you can put in a pot.
Within the tuberous group there are several forms worth knowing: upright bushy types that look great in a classic pot, Pendula (or cascading) types that trail beautifully over the edge of a hanging basket, compact Non-Stop bedding types that flower for months with minimal fuss, and Multifloras that produce smaller but very prolific blooms. The RHS puts it plainly: tuberous begonias are ideally suited to containers and hanging baskets, which is exactly why this guide focuses on them.
Wax begonias (Begonia x semperflorens-cultorum) are the tough, heat-tolerant ones you see planted en masse as summer bedding. They work fine in pots too, but their flowers are much smaller and they don't have the same drama. If you want color and don't want to fuss with dormancy at all, wax begonias are a solid, low-maintenance choice.
Cane-type begonias, sometimes called angel wing begonias, are another option if you want something that tolerates bright indoor light and is generally forgiving for beginners. But if you searched for how to grow begonias in pots because you saw a photo of those enormous, lush flowers, you're thinking of tuberous types. Once you understand tuberous begonia needs, you can follow the same pot-care approach to grow them successfully in containers how to grow begonias in pots.
If you want to try a different container crop, you can also learn how to grow pickles in a pot how to grow begonias in pots. That's what the rest of this guide is about.
Pot Size, Drainage, and Where to Put Them
When you're starting a single tuber indoors to get it going before the season, a container around 10 cm (roughly 4 inches) is perfectly fine for the early stage. Once the plant is actively growing and you're moving it to its permanent home for the season, you want something bigger. For a single upright tuberous begonia, a pot that's at least 8 to 12 inches in diameter works well. For hanging Pendula types, a hanging basket of at least 12 to 14 inches across gives the roots enough room and lets the trailing stems cascade properly. If you're planting multiple tubers together, just make sure they have a few inches of space between each one.
Drainage is non-negotiable with begonias. Their tubers rot remarkably fast if they sit in waterlogged soil. Every pot you use needs drainage holes at the bottom, and I mean genuinely open holes, not just slits that get plugged by soil. If you fall in love with a decorative pot that has no drainage, use it as a cachepot and put your actual growing container inside it. Don't fill the bottom with gravel hoping it will substitute for drainage holes. It won't, and you'll lose your tubers.
For placement, tuberous begonias genuinely prefer shade or dappled light. This is one of their great strengths as container plants: they're one of the few plants that give you long bloom periods in spots where direct sun is limited. A north or east-facing patio, a spot under a pergola, or the shaded side of a balcony all work brilliantly. They'll tolerate morning sun, but intense afternoon sun will scorch the leaves and fade the flowers fast.
If you're growing other flowering container plants in full sun spots, look into geraniums or gazania for those locations. You can also learn how to grow gazania in pots by matching the light, watering, and soil drainage needs to this sun-loving plant geraniums or gazania. If you want another container option for sunnier spots, the same pot-care basics can also be applied to geraniums.
If you like these conditions but want a different look, you can also learn how to grow gerbera daisy in pots for similar container-friendly results. Begonias are your solution for the shady corners.
Getting the Soil and Container Setup Right

The potting mix you use matters a lot more with begonias than with tougher plants. You want something that holds enough moisture to keep the roots from drying out completely between waterings, but drains freely enough that the tuber never sits in soggy soil. A good quality peat-based or coir-based potting mix with added perlite hits that balance well. Perlite is the white, lightweight granules that improve drainage and aeration. Aim for a ratio of roughly 3 parts potting mix to 1 part perlite if your mix doesn't already contain it. Avoid heavy garden soil or any mix that clumps and stays wet for days.
For pH, you're looking for a slightly acidic mix, somewhere in the range of 5.5 to 6.5. Most quality commercial potting mixes fall into that window naturally, so you don't need to obsess over it, but if you're mixing your own from components, keep that range in mind. Coir (coconut fiber) can vary in pH depending on its source, so if you're using a coir-heavy mix, it's worth doing a quick pH check.
Before you fill the pot, make sure the drainage holes aren't going to get blocked by soil washing out. A piece of mesh or a coffee filter over the holes works fine. Then fill the pot about two-thirds full with your mix before placing the tuber. You want to be able to position the tuber and then cover it without overfilling the pot.
How to Plant Begonia Tubers in Pots
Timing: start indoors early
Start your tubers indoors 8 to 10 weeks before your average last spring frost date. Here in the Northern Hemisphere, for most gardeners that means getting tubers going somewhere between late January and early March depending on where you live. You don't move them outside until all frost risk is gone, which might be April or May depending on your region. Starting early gives you a head start so you get a longer bloom season, and it takes begonias a while to establish before they start flowering. Don't rush the outdoor move. One late frost can wipe out a pot of begonias very quickly.
While they're getting established indoors, keep them somewhere around 70°F with indirect light. They don't need intense light at this stage, just warmth and something bright but not direct sun beating down on them.
Planting depth and orientation
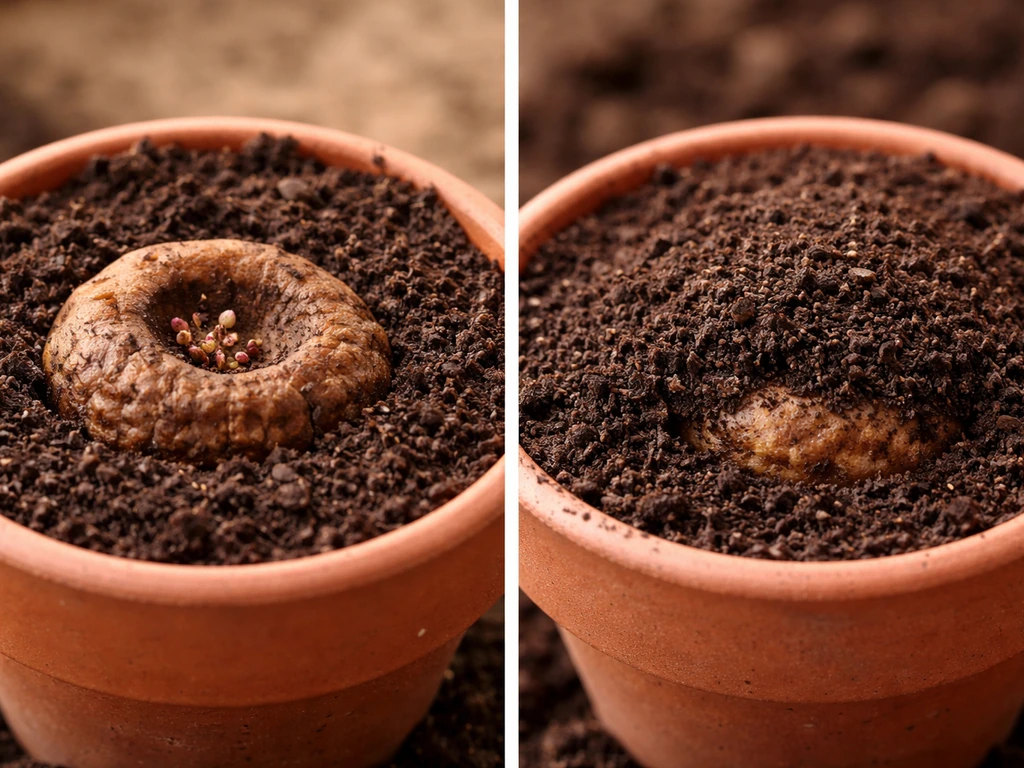
This is where a lot of first-timers go wrong, and it's actually simple once you know what to look for. Tuberous begonia tubers have a concave (hollowed out, slightly dished) side and a convex (rounded, bumpy) side. The concave side with any visible buds or growing points faces up. The rounded side goes down. If you plant them upside down, you'll get very patchy growth or nothing at all.
Place the tuber in the pot with space around it so roots can develop on all sides, then cover it with about 1 inch of potting mix. That's it. Don't bury it deep. A thin covering encourages roots to develop all around the surface of the tuber rather than just underneath it. Some growers leave the very top of the tuber barely at or just below the soil surface. Either way, keep it shallow.
Water lightly after planting, just enough to moisten the mix. Then resist the urge to water heavily until you see growth appearing. Tubers sitting in wet soil before they're actively growing is one of the main causes of rot, and it happens fast.
One useful habit I'd suggest: about 4 to 6 weeks after potting, gently knock the tuber out of the container to check on root development. If roots are forming well and the tuber looks firm and healthy, you're in good shape. If you see soft, mushy spots on the tuber, trim them away with a clean knife, let the cut dry for a day, and dust with a fungicide powder before repotting. Catching rot early saves tubers that would otherwise be lost.
Watering and Feeding Your Begonias in Containers
Watering: the single most important thing to get right
The rule for watering tuberous begonias in pots is simple: let the top inch or two of soil dry out between waterings, then water thoroughly. You're aiming for consistently moist but never soggy. Stick your finger into the top of the soil. If it's still damp, wait. If it's dry to an inch deep, water. In hot weather you might be watering every day or two. In cooler, cloudier spells, every 3 to 4 days might be enough. The pot tells you; the calendar doesn't.
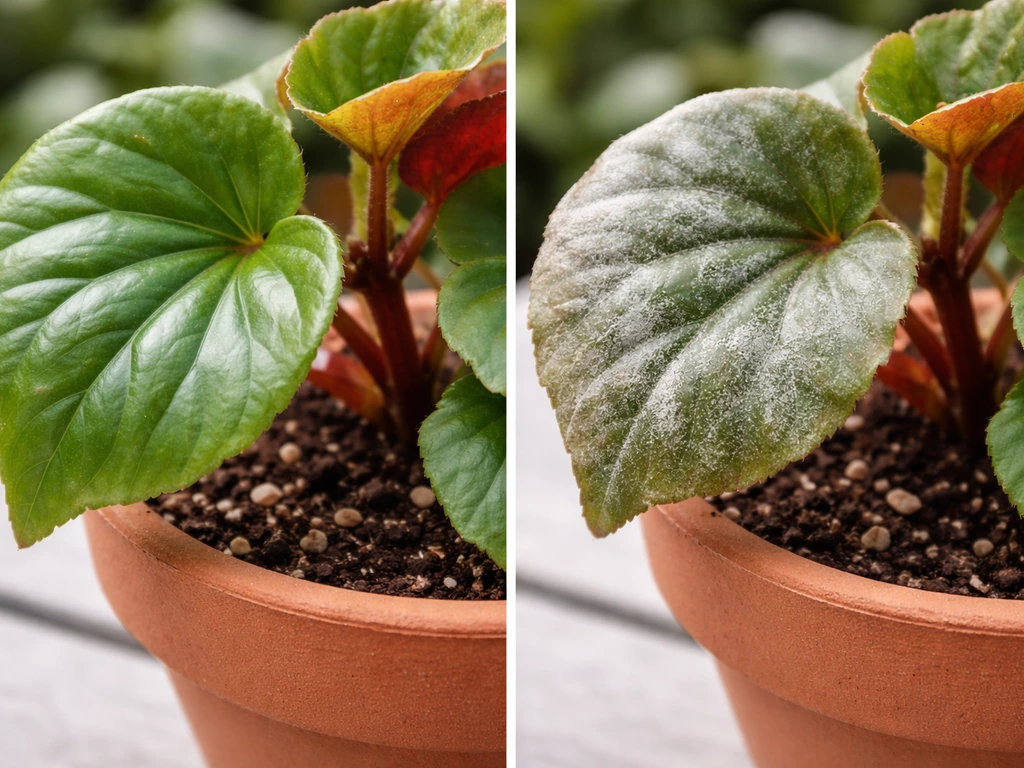
Always water at the base of the plant rather than overhead. Getting water on the foliage, especially in the evenings, is one of the fastest routes to powdery mildew and Botrytis blight. If you water in the morning and aim for the soil, the foliage stays dry and airflow does the rest. This is genuinely one of the most practical disease-prevention steps you can take.
Feeding schedule for big blooms
Tuberous begonias in containers are heavy feeders because the roots can't go searching for nutrients the way they can in the ground. A balanced fertilizer with equal N-P-K (something like a 10-10-10 or 20-20-20) works well through the growing season. Feed roughly every 10 to 14 days during active growth. Before buds start forming, you can give a diluted foliar feed of a balanced formula like 20-20-20 to support flowering. Once flowering is in full swing, keep up the regular feeding schedule. When flowering slows down at the end of the season and the plant starts heading toward dormancy, stop feeding entirely. Fertilizing a plant that's shutting down is wasteful at best and stressful at worst.
Light, Temperature, and Seasonal Care (Including Dormancy)
During the growing season, tuberous begonias want bright but indirect light. Dappled shade, filtered light through a tree canopy, or a spot that gets a few hours of gentle morning sun is ideal. As temperatures drop in autumn and daylight shortens, the plant naturally slows down. Leaves may yellow, stems may go limp, and flowering stops. This is normal. This is dormancy, and it's a completely natural part of the tuberous begonia life cycle, not a sign that you did something wrong.
In September, some gardeners remove developing buds to signal to the plant that it's time to store energy in the tuber rather than pushing flowers. It's optional, but it can help build a stronger tuber for next year. Once the foliage has died back after the first frost (or just naturally in warmer climates), it's time to prepare tubers for storage.
Overwintering your tubers
In climates with frost, you have two options: treat tuberous begonias as annuals and buy new tubers each spring, or dig up and store the tubers to replant next year. UMN Extension notes that tuberous begonias are grown from tubers that can be dug up in fall and stored in a cool, dry place to plant again the next year dig up and store the tubers to replant next year.
Overwintering is easy and saves money. After the foliage dies back, carefully dig the tuber out of the pot. Brush off as much soil as you can, let the tuber dry out in a warm spot for a few days, then store it in a cool, dark place at around 40 to 50°F.
After the tubers are thoroughly dry, the American Begonia Society recommends placing them in paper bags and storing them in a cardboard box in a dark, dry, cool place for winter store it in a cool, dark place at around 40 to 50°F. A paper bag, a box filled with dry peat or vermiculite, or even a breathable mesh bag works well.
Check on them once a month through winter. If you see any soft spots starting, cut them away and dust with sulfur before putting them back in storage. In spring, pull them out 8 to 10 weeks before your last frost and start the cycle again.
Dealing With Pests, Disease, and Common Pot Problems
Most begonia problems in containers come down to two things: too much moisture and not enough airflow. Get those two factors right and you'll avoid the majority of issues.
Diseases to watch for
Powdery mildew shows up as a white or grey powdery coating on the leaves, usually when nights are cool and humid and airflow is poor. Botrytis blight (grey mold) is more serious and causes soft, brown, rotting patches on leaves, stems, and flowers, often with a fuzzy grey coating. Both thrive in wet, stagnant conditions. Prevention is far easier than treatment: water at the base, water in the morning so leaves dry quickly, space plants so air moves between them, and remove any dead or dying leaves and spent flowers promptly. Once Botrytis takes hold in a pot, it spreads fast. Remove affected tissue, improve airflow, and reduce watering.
Stem rot and tuber rot are the ones that panic beginners the most, and they're almost always caused by overwatering or a pot with inadequate drainage. If a stem collapses at the base, the tuber is usually rotting. Catch it early and you might save part of the tuber. Let it go and the whole pot is done. When in doubt, err on the side of underwatering with begonias.
Common pests
The most common pests on potted begonias are mealybugs, aphids, thrips, and vine weevils. Mealybugs look like small white cottony clusters, usually tucked into stem joints. Aphids cluster on new growth and under leaves. Both respond well to insecticidal soap or neem oil spray applied consistently every few days.
Thrips cause silvery streaking and distortion on flowers and leaves. Vine weevils are more serious because their grubs attack the tuber underground. If you notice notching on leaf edges (adult weevils) or if a plant suddenly collapses for no obvious reason (grub damage to the tuber), treat with a biological nematode drench. Checking the tuber when you knock the plant out of its pot for that 4-to-6-week inspection is also a good opportunity to spot grubs early.
Fixing leggy growth and poor blooming
If your begonia is getting long and stretchy with few flowers, it's almost certainly not getting enough light. Move it to a brighter spot, but keep it out of direct afternoon sun. If it's leafy and green but not flowering, check your fertilizer: too much nitrogen (the first number in the N-P-K ratio) will push leaves at the expense of flowers. Switch to a more balanced formula and make sure feeding frequency is in the 10-to-14-day range, not more often.
Supporting Your Plants and Encouraging More Blooms
Upright tuberous begonias, especially the large-flowered varieties, can get top-heavy when they're in full bloom. The stems are fleshy and can snap in wind or under the weight of big flowers. A small bamboo stake and a loose tie added early in the season, before the plant needs it, is much easier than trying to prop up a collapsed stem later. Use soft ties or strips of fabric rather than wire, which can cut into the stem.
Deadheading, which just means removing spent flowers before they turn brown and seed, keeps the plant looking tidy and encourages it to put energy into new buds rather than producing seeds. On tuberous begonias, you'll notice that male and female flowers form in clusters of three: the large showy flower in the middle is usually male, and the smaller flowers on either side are female. You can remove the female flowers early if you want to push more energy into the showiest male blooms. It's optional but worth trying if you want maximum impact.
One more practical tip: tuberous begonias in pots do best when they're not crammed in with a lot of other plants competing for water and nutrients. They're stars in their own right. Give them their own container and let them be the feature, rather than one plant among many. The flowers are spectacular enough to earn that solo treatment.
Quick Reference: Tuberous Begonia in a Pot at a Glance
| Factor | Recommendation |
|---|---|
| Start tubers indoors | 8–10 weeks before last frost date |
| Indoor growing temperature | Around 70°F with indirect light |
| Move outdoors | Only after all frost risk has passed |
| Pot size (single tuber) | At least 8–12 inches diameter |
| Planting depth | About 1 inch of mix over the tuber |
| Tuber orientation | Concave/budded side facing up |
| Light | Bright indirect light or dappled shade |
| Watering | Let top 1–2 inches dry between waterings |
| Feeding | Balanced fertilizer (10-10-10 or 20-20-20) every 10–14 days |
| Stop feeding | When flowering slows and plant heads into dormancy |
| Winter storage temperature | 40–50°F, cool and dark |
| Potting mix pH | 5.5–6.5 |
Tuberous begonias are genuinely one of the most rewarding plants you can grow in a container, and once you've grown them through a full season and successfully overwintered a tuber, you'll understand why so many container gardeners keep coming back to them year after year. The first season is the learning curve. After that, it becomes second nature.
FAQ
My tuber sprouted but won’t grow much. What should I check first when growing begonias in pots?
If you see tubers sprouting but the plant stays pale and weak, it can be from light that is too dim rather than a watering issue. Move the pot to brighter indirect light, still avoiding direct afternoon sun, and hold back on fertilizer until you have steady leaf growth. Also make sure the potting mix is warm, ideally around room temperature, because cold mix slows root uptake even if you water correctly.
I may have planted my begonia tuber too deep. Should I repot or just adjust watering?
For tuberous begonias, the goal is to cover the tuber with about 1 inch of mix, not to bury it. If you accidentally planted too deep, gently lift and replant shallow rather than trying to “fix” it by changing watering. Deep planting tends to increase the risk of rot because the tuber remains wet longer and has less oxygen at the crown.
How do I avoid overwatering when I grow begonias in pots, especially if the pot sits on a saucer?
Use a potting mix test by feel, if you do not have a moisture meter. After watering thoroughly, it should not stay wet on the surface, and when you check 1 to 2 inches down with your finger, it should feel dry before the next watering. Saucers are risky because they trap runoff, so it is safer to empty the saucer after watering or avoid saucers entirely.
Can I move tuberous begonias outdoors earlier if I protect them at night?
Yes, but only after plants have established outside conditions. Hardening off means gradually increasing light and outdoor exposure over 7 to 10 days, starting in dappled shade and moving toward a few hours of morning sun. Do not place tuberous begonias in full sun right away, and protect from cool nights since cool, humid conditions increase mold risk.
Should I repot tuberous begonias during the season to help them bloom more?
For container tuberous begonias, repotting the same season is usually unnecessary. Only repot if drainage failed, if the tuber is rotting, or if the tuber was planted too deep. Otherwise, let roots fill the pot gradually, because frequent disturbance can delay flowering.
Do I need to prune potted begonias to get more flowers?
Most of the time, begonias do not need pruning beyond removing dead leaves and spent flowers. Cutting back healthy green foliage generally reduces photosynthesis and can delay flowering. If stems are leggy, the better fix is more light and correct feeding rather than heavy pruning.
My begonia looks lush but won’t flower. How can I troubleshoot pot-grown tuberous begonias?
If your plant produces lots of leaves but few blooms, first check nitrogen level and timing. Too much nitrogen pushes leaf growth, so switch to a more balanced fertilizer and keep feeding on the 10 to 14 day schedule during active growth. Also confirm the light is bright and indirect, not dim shade, because insufficient light is another common reason flowering stalls.
Is it possible to divide tuberous begonias I’ve grown in pots to make new plants?
Yes, you can propagate by division in some cases, but tuber division must be done carefully because each piece needs enough viable growth points. Do it only when you are handling tubers during dormancy and before replanting, not while the plant is actively growing in the pot. If you cut, let sections dry briefly and dust with appropriate protection to reduce rot risk.
What should I do with watering when tuberous begonias in pots start going dormant?
During dormancy, do not keep them in a continuously damp mix. After foliage dies back and you move to storage, tubers should be kept dry enough that they do not shrivel badly but not wet enough to feel soft. In the growing season, wet foliage increases disease, so you should always water at the base and aim for morning watering.
How can I tell whether I have thrips or vine weevils on my potted begonias, and what’s the best next step?
If you treat for pests and the damage continues, isolate the pot and inspect the tuber if the plant collapses or growth suddenly stops. Thrips and vine weevil activity can be missed on the first pass. A nematode drench is best for vine weevils because the grubs live underground, while repeated insecticidal soap or neem treatments work best for aphids and mealybugs when applied consistently.