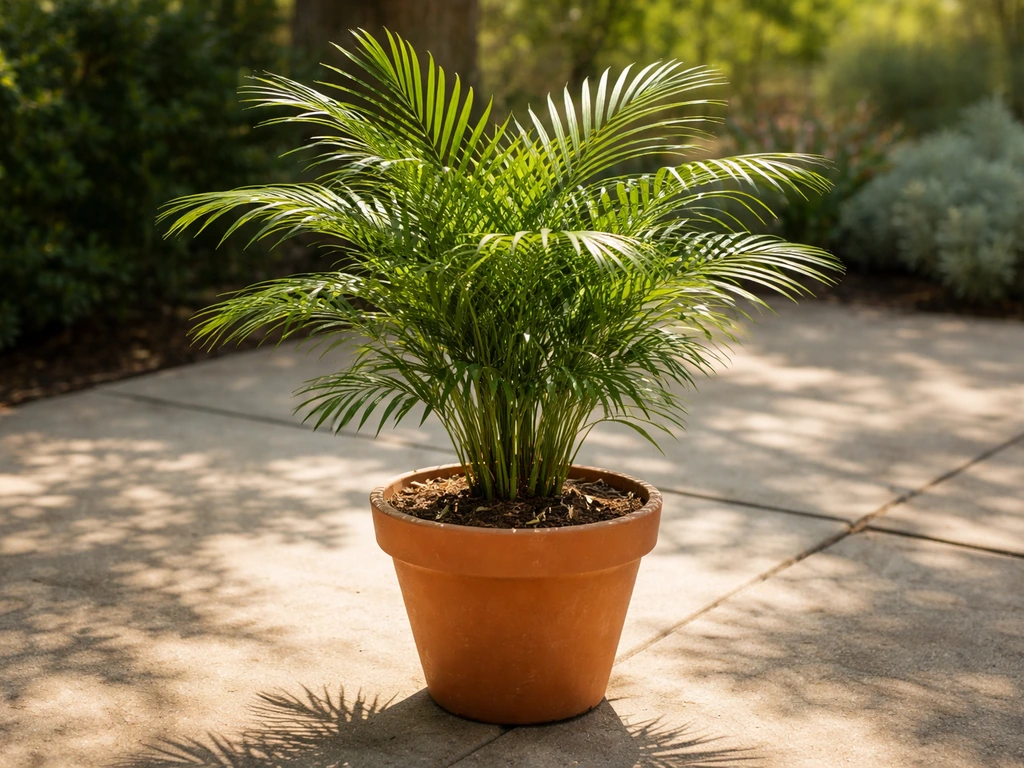
Yes, you can grow a palm in a pot, and it can look genuinely spectacular on a patio, balcony, or in a bright living room. If you can handle the basics of choosing a pot, drainage, and a repeatable watering routine for container palms, you can use the same container mindset for how to grow olive trees in pots uk too. The trick is picking a species that actually tolerates container life, setting it up with the right soil and drainage from day one, and then following a watering and feeding routine that keeps it healthy rather than stressed. I've grown palms in pots for years, made plenty of mistakes along the way, and this guide covers everything I wish someone had told me at the start.
How to Grow Palms in Pots: Step-by-Step Care Guide

Marcus Whitley
22 Apr 2026
Choosing the right palm for a pot

Not every palm is suited to container life. Some species grow enormous root systems or shoot up to 30 feet and will fight against any pot you give them within a couple of years. The palms that thrive in containers tend to stay compact, tolerate root restriction, and adapt to the lower water and nutrient availability that comes with pot growing. Here are the ones I'd genuinely recommend.
| Palm Species | Common Name | Max Pot Height | Indoor/Outdoor | Cold Tolerance |
|---|---|---|---|---|
| Phoenix roebelenii | Pygmy date palm | 6–8 ft | Both | Down to 28°F (Zone 9) |
| Chamaedorea elegans | Parlour palm | 4–6 ft | Primarily indoor | Down to 50°F indoors |
| Chamaedorea seifrizii | Bamboo palm | 6–8 ft | Both | Light frost only |
| Rhapis excelsa | Lady palm | 5–8 ft | Both | Down to 22°F (Zone 8b) |
| Livistona chinensis | Chinese fan palm | 8–10 ft | Outdoor/large space | Down to 22°F (Zone 8b) |
| Dypsis lutescens | Areca palm | 6–10 ft | Both | Above 50°F; frost-sensitive |
My personal top pick for beginners is Chamaedorea elegans, the parlour palm. It is practically indestructible, grows slowly, tolerates low light and indoor humidity, and stays small enough for most apartments. If you want something a bit more dramatic outdoors, Phoenix roebelenii, the pygmy date palm, is a stunning choice. It's compact, has that classic feathery palm look, and handles pot life well.
If you are specifically interested in growing a date palm in a pot or a sago palm in a container, those are distinct enough topics with their own quirks that they deserve their own deep-dives. If you specifically want to focus on the date palm itself, that changes a few key care details in container gardening a date palm in a pot. The guidance here applies broadly, but keep those species' specific needs in mind.
Sago palms can be grown in pots too, but they need the right warm spot, fast-draining soil, and careful watering to prevent rot sago palm in a container.
One thing to decide early: are you growing indoors, outdoors, or moving the palm between the two seasonally? Cold-sensitive species like Areca palms are fine outdoors in summer but need to come inside before temperatures drop below 50°F. Rhapis and Chamaedorea are more forgiving and can handle brief cold snaps, making them better choices if you live somewhere with unpredictable springs and autumns.
Picking the perfect pot, drainage, and location
Pot size and material
Start with a pot that is roughly 2 inches wider in diameter than the palm's current root ball, not much more. Palms actually do well when slightly root-bound, and a pot that is too large holds excess moisture that can rot the roots. For a small nursery palm in a 6-inch nursery pot, move up to an 8- or 10-inch container. For a larger specimen, a 14- to 18-inch container is usually the sweet spot for a few years of stable growth before you need to upsize.
Material matters more than people think. Terracotta is my favorite for outdoor palms because it breathes, helping prevent the waterlogged conditions that palms hate. The downside is weight, which can be a real problem on balconies with load limits. Plastic or fiberglass pots are lighter and retain moisture longer, which is actually useful if you are growing an Areca or bamboo palm that likes more consistent moisture. Avoid glazed ceramic pots with only one drainage hole, as they trap moisture aggressively.
Drainage is non-negotiable
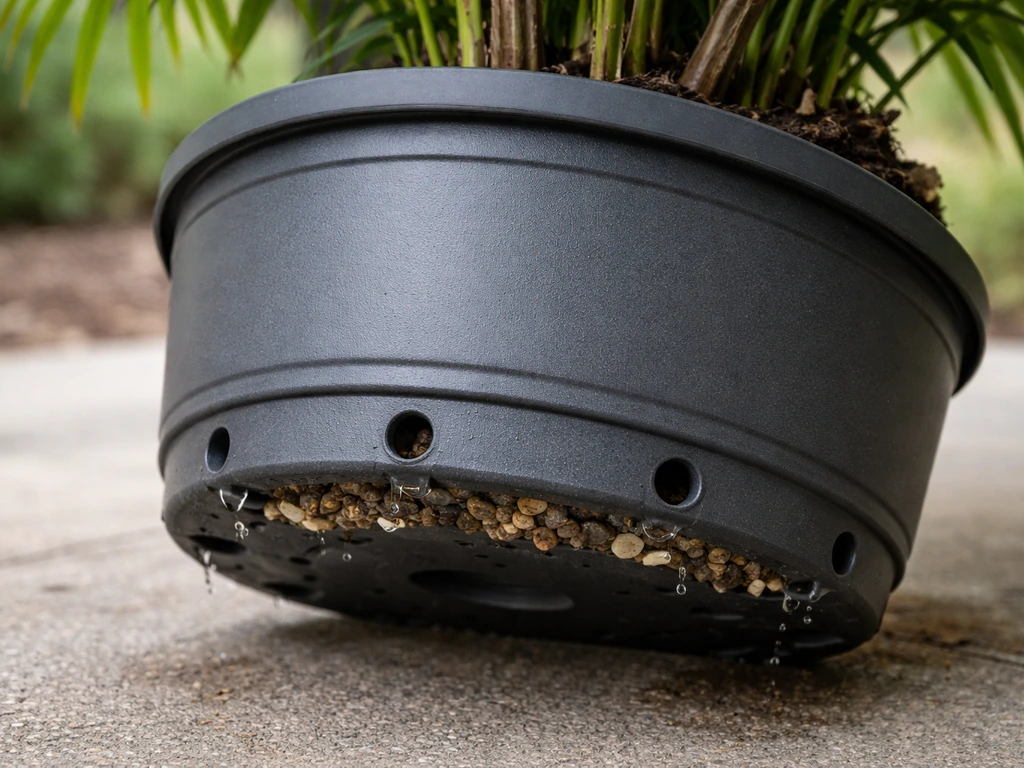
Every pot you use for a palm needs at least two or three drainage holes, ideally in the base and possibly on the sides near the bottom. If your pot only has one hole, drill more before planting. Sitting water at the root zone is the number one killer of container palms. Place the pot on feet or a stand so water can escape freely, and never leave a saucer full of water under the pot for more than a day.
Picking the right location
Most palms want bright light. Outdoors, a spot that gets 6 or more hours of direct sun is ideal for species like Phoenix roebelenii, Livistona, and Areca. Indoors, place the palm within 3 feet of a south- or west-facing window. Chamaedorea elegans and Rhapis excelsa are the exception, tolerating bright indirect light and even lower-light corners, which is why they are so popular as houseplants. Avoid placing any palm directly against a cold exterior wall in winter or in a spot where a heating or air conditioning vent blows directly on the fronds.
Potting mix and soil setup for container palms
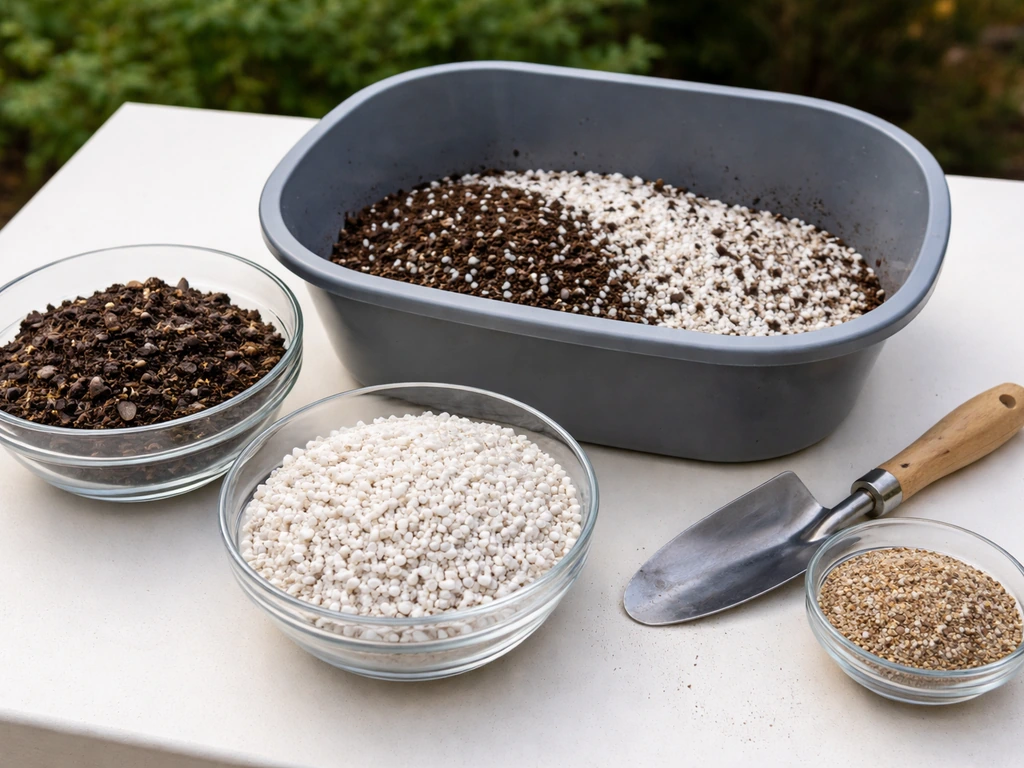
Standard potting compost on its own is not ideal for palms. It tends to stay too wet and compact over time, which suffocates palm roots. What palms need is a fast-draining mix that still holds enough moisture and nutrients to support growth. Here is the mix I use and trust:
- 50% quality potting mix or cactus mix as the base
- 25% coarse perlite or pumice for drainage and aeration
- 25% coarse horticultural sand or fine bark chips to improve structure
If you want to keep it simple, a pre-mixed cactus and palm potting soil from a garden center works reasonably well on its own, though I still add a handful of perlite per gallon of mix to improve drainage. What to avoid: heavy garden soil, which compacts badly in containers; pure peat-based mixes, which retain too much moisture; and any mix with a lot of wood chips that hasn't fully composted, as these can rob the palm of nitrogen as they break down.
At the bottom of the pot, you do not need a thick gravel layer. A single layer of large stones or pot shards over the drainage holes is enough to stop the mix from washing out. The old advice about a deep gravel layer actually creates a perched water table that keeps the soil above it wetter for longer, which is the opposite of what you want.
Planting and transplanting step-by-step
Whether you are planting a nursery-bought palm or transplanting one that has outgrown its current pot, the process is mostly the same. One principle I follow religiously: plant at the exact depth the palm was growing in its previous container. Burying the base of the trunk deeper than it was previously can cause rot and slow establishment significantly. You can usually see a soil line or color change on the trunk that tells you exactly where the old soil level was.
- Water the palm in its nursery pot about an hour before transplanting so the root ball holds together cleanly when you remove it.
- Add a few inches of your prepared potting mix to the bottom of the new pot, tamping it lightly.
- Ease the palm out of its nursery pot by squeezing the sides gently and tipping it. Do not yank it out by the trunk.
- Loosen the outer edges of the root ball gently with your fingers if the roots are circling tightly around the base, but avoid tearing the main root mass.
- Set the palm in the new pot and check the height: the base of the trunk should sit at the same level it did before, with the soil surface about 1–2 inches below the rim of the pot to allow for watering.
- Fill in around the root ball with your potting mix, pressing it in firmly but not aggressively to remove large air pockets.
- Water thoroughly until water drains freely from the bottom, then let the pot drain completely before placing it in its final location.
If you are growing from seed rather than nursery stock, be ready for a long wait. Germination timing varies a lot by species and temperature. Phoenix roebelenii, for example, takes around 90 days to germinate at 77°F, around 120 days at 59°F, and up to 150 days at 41°F. Keeping the seeds warm makes a real difference. Chamaedorea species also benefit from a pre-soak of 24 to 48 hours before planting to soften the seed coat. Sow palm seeds about 1 inch deep in a warm, moist, well-draining mix and be patient. Germination can vary tremendously even between seeds from the same plant.
Watering and fertilizing schedule for potted palms
How and when to water
The rule I follow: water deeply but infrequently. If you want to grow oleanders in pots, keep a close eye on soil moisture and feed regularly during the warm growing season Watering and fertilizing schedule for potted palms. When you water, pour slowly until water flows freely from the drainage holes, then do not water again until the top 1–2 inches of soil are dry.
In warm summer months, that might mean watering every 3–5 days for an outdoor palm in a terracotta pot. In winter or for an indoor palm in a plastic pot, it might be every 10–14 days. Stick your finger into the soil to check rather than going by a fixed schedule, because light, temperature, and pot material all affect how fast the soil dries out.
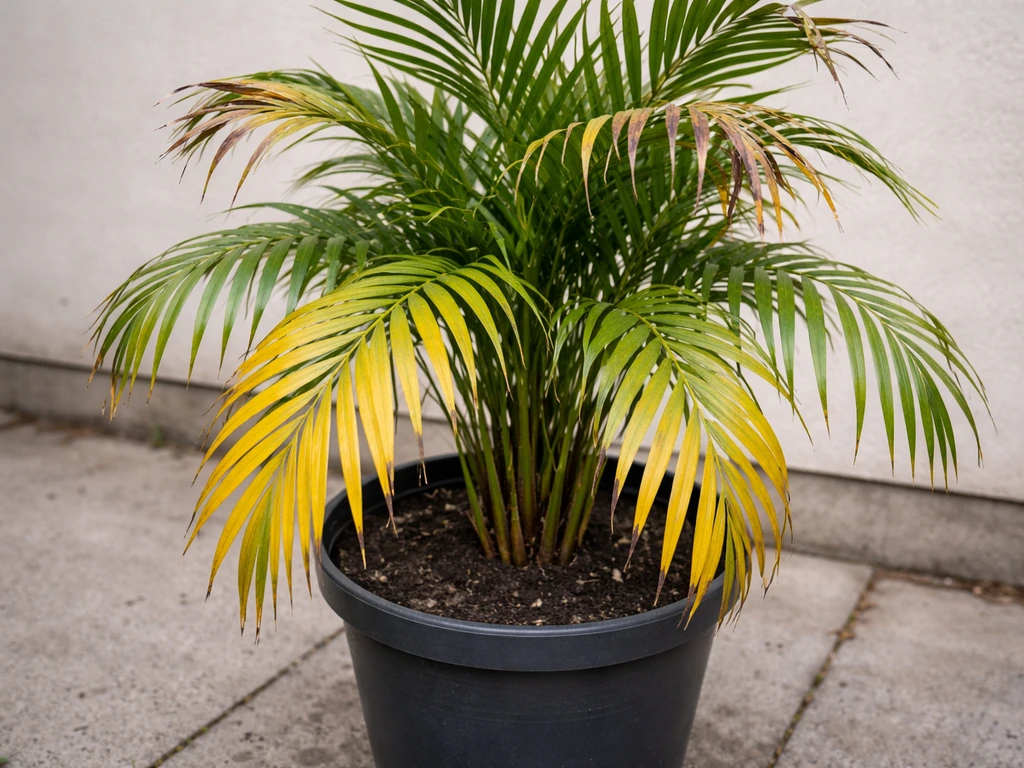
Signs your palm needs water: the oldest fronds start to look slightly limp or the tips begin to brown. Signs you are overwatering: yellowing of lower fronds, a sour smell from the soil, or mushiness at the base of the trunk. Overwatering is far more common than underwatering, especially with indoor palms in winter. When in doubt, wait another day or two before watering.
Fertilizing your potted palm
Container palms run out of nutrients faster than in-ground plants because watering flushes nutrients out of the mix over time. Use a slow-release palm fertilizer granule (look for one with an N-P-K ratio around 8-2-12, which is a standard palm formula) applied once in early spring and once in early summer. In addition to the main N-P-K nutrients, palms are particularly prone to deficiencies in magnesium and manganese, so choose a fertilizer that includes these micronutrients.
A monthly application of a half-strength liquid fertilizer during the growing season (spring through late summer) can supplement the slow-release granules nicely. Stop fertilizing from late September through February to allow the palm to rest. Feeding through winter when growth has slowed just pushes salts into the soil without the plant being able to use them.
Light, temperature, and humidity care tips
Most palms originate in tropical and subtropical climates, which tells you a lot about what they need. They want warmth, good light, and some level of humidity. In a container, you have more control over all three of these than you might think.
For light: outdoor palms should get at least 4–6 hours of direct sun daily for sun-loving species. Shade-tolerant species like parlour palm and lady palm are comfortable with bright indirect light all day, which is why they perform so well indoors near a window. If you are moving a palm from indoors to an outdoor summer position, acclimatize it gradually over 1–2 weeks to avoid sunscorch on the fronds. Start it in dappled shade for a few days, then move it into progressively more sun.
For temperature: most tropical palms should not be exposed to temperatures below 50°F for extended periods. Cold-hardy species like Rhapis excelsa and Chamaedorea seifrizii can handle brief dips lower, but a general rule is to bring cold-sensitive palms indoors when nighttime temperatures consistently drop below 50°F. Avoid placing palms near heat sources in winter (radiators, vents) as the dry heat stresses them almost as much as cold.
For humidity: indoor palms in particular suffer from dry air, especially in centrally heated homes in winter. Aim for humidity above 50% if possible. Practical ways to boost humidity around your palm include placing a tray of pebbles and water beneath the pot (without the pot sitting directly in the water), grouping it with other plants, or running a small humidifier nearby. Misting the fronds provides only brief relief and can actually encourage fungal issues if the fronds stay wet overnight.
Common problems and troubleshooting in containers
Container palms face a predictable set of problems. Most of them are fixable once you know what you are looking at. Here is what I see most often and how I deal with it.
| Problem | Most Likely Cause | Fix |
|---|---|---|
| Yellow lower fronds | Overwatering or natural aging of old leaves | Check soil moisture and drainage; reduce watering frequency; remove dead fronds cleanly |
| Brown leaf tips | Low humidity, underwatering, or salt build-up in soil | Increase humidity, water more consistently, flush soil thoroughly with plain water |
| All fronds yellowing | Root rot from waterlogged soil or severe nutrient deficiency | Repot into fresh, well-draining mix; check roots for rot (trim black/mushy roots); begin fertilizing |
| Pale or bleached fronds | Too much direct sun after being in low light, or manganese deficiency | Move to slightly shadier spot; use a palm-specific fertilizer with micronutrients |
| Fronds drooping or wilting | Underwatering or root stress after repotting | Water deeply; keep stable for 4–6 weeks post-transplant to allow roots to settle |
| White cottony patches on fronds | Mealybugs | Wipe off with isopropyl alcohol on a cotton swab; treat with neem oil spray weekly for 3–4 weeks |
| Tiny yellow dots on fronds, webbing | Spider mites (common in dry indoor air) | Increase humidity; spray foliage with water; treat with insecticidal soap or neem oil |
| Palm not growing at all | Roots too cold, repotted too deep, or wrong season | Check temperature, confirm planting depth is correct, and be patient through winter dormancy |
One thing worth mentioning: palms naturally drop their oldest (lowest) fronds as they grow, and a few yellow or brown leaves at the bottom is perfectly normal. Do not panic every time an old frond turns brown. Only start troubleshooting when you see yellowing spreading to newer growth, multiple fronds affected at once, or any softness or rot at the base of the trunk.
Root stress from being pot-bound is another issue that sneaks up on container palms. If your palm has been in the same pot for 3–4 years and you notice very slow growth, roots circling visibly out of the drainage holes, or the soil drying out unusually fast, it is time to move up one pot size. Go up by about 2 inches in diameter, use fresh potting mix, and transplant in spring when the plant is ready to grow into its new space.
Growing palms in pots is genuinely achievable, even for beginners, and the process is the same whether you are working with a tiny parlour palm on a windowsill or a dramatic pygmy date palm on a sunny patio. Osteospermum is also a great container plant, and with the right pot, soil, and watering routine you can grow it successfully on a patio or balcony potted palms.
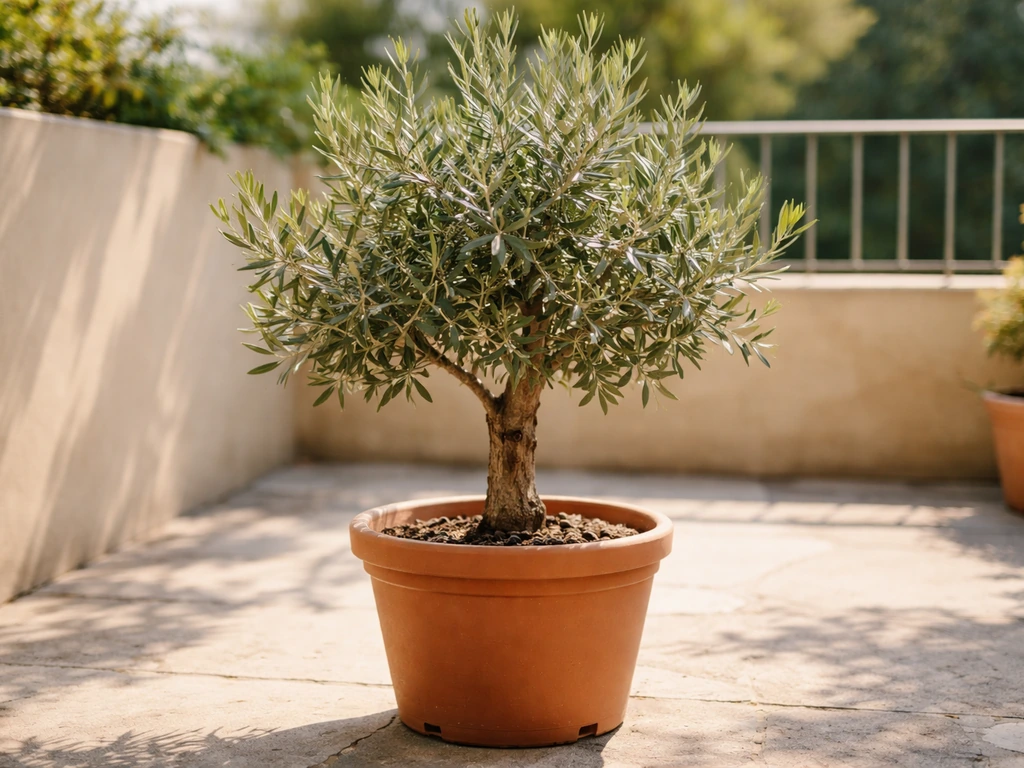
Get the species choice, drainage, and watering right from the start, and you are most of the way there. The same container basics also apply when you are learning how to grow olive tree in pot, including pot size, drainage, and a careful watering routine. The rest is just paying attention and adjusting as you go.
In a r/plantclinic thread about a declining pygmy date palm, commenters recommend de-potting to check for rot or dead roots when a container palm starts to decline adjusting as you go. If you are also curious about olives, follow our guide on how to grow olive tree in pot for similar container tips.
Sandalwood can also be grown in a container, but it needs the right warmth, light, and a fast-draining mix how to grow sandalwood tree in a pot.
FAQ
Can I replace or refresh potting mix on a palm without repotting?
Yes, but only if you do it as a targeted refresh. If your palm is still healthy, top-dress 1 to 2 inches of fresh fast-draining mix instead of fully replacing the potting soil. Full repotting is stressful, so do it in spring and keep the palm at the same planting depth, using a pot only about 2 inches wider than the old one.
How do I avoid overwatering when growing palms in pots?
Use a moisture check and a “wait rule.” If the top 1 to 2 inches of soil are still damp, don’t water, even if the calendar says to. Overwatering often looks like yellowing of lower fronds and a mushy base, so when in doubt, delay 1 to 2 days and recheck with your finger.
What parts of a potted palm should I prune, and what should I never cut?
Pruning container palms is mostly about removing leaves, not cutting into the trunk. Remove only fully brown or badly damaged fronds at the base with clean tools. Don’t trim healthy green fronds to “shape” the palm, and avoid cutting any trunk tissue, because palms do not recover like many shrubs.
When is the right time to move an outdoor potted palm indoors for winter?
In most climates, you should not expect container palms to “self-buffer” cold. A practical plan is to move the pot indoors before nighttime temperatures fall below 50°F consistently, keep it away from hot or dry vents, and place it in the brightest available spot (south or west window) during winter.
Do palms in pots need direct sun, or will window light be enough?
Chamaedorea elegans and Rhapis generally tolerate lower light better, but they still need brightness to stay compact. If you see slower growth plus paler new leaves, increase light gradually over 1 to 2 weeks to avoid leaf scorch, especially after moving from outdoors to inside.
What should I do if my potted palm has fertilizer salt buildup or a crust on the soil?
Flush it. If you notice crusty fertilizer residue on the soil surface or the potting mix smelling sour, water thoroughly until water runs from the drainage holes, then let it drain completely. For repeat salt buildup, do one extra deep watering and skip fertilizer for a cycle rather than increasing doses.
How do I know when my palm has outgrown its pot?
Repot when you see root circling at drainage holes, very slow growth, or the soil drying unusually fast compared to past behavior. As a rule, upsize only one step (about 2 inches wider in diameter) and do it in spring so the palm can recover quickly.
What are the best ways to increase humidity for indoor palms in winter?
Use humidity support that doesn’t keep the roots wet. Pebble trays can help if the pot sits on the pebbles without touching standing water, and grouping plants raises local humidity. Avoid misting as your main strategy, since staying wet overnight can encourage fungal problems.
Should I let my potted palm sit in water or keep water in the saucer?
Not really, and it often causes rot. Palms need good drainage and slightly drier cycles, so a saucer should be emptied within about a day. If your indoor environment stays cool and the soil stays wet for long periods, skip saucer water entirely and rely on finger-depth checks.
What fertilizer approach works best for palms in pots that are indoors?
It helps, especially during warm months when the pot dries unevenly. A slow-release granule plus a dilute liquid feed in the growing season is more reliable than one heavy feeding. Also, make sure your fertilizer includes magnesium and manganese, because deficiency symptoms are often blamed on “bad watering” but are actually nutrient-related.
My indoor potted palm has yellowing. How can I tell if it is light, water, or cold stress?
Consider temperature and water first. Cold plus wet is the worst combination, so protect the palm from drops below 50°F and ensure the mix drains quickly. If you have one of the newer fronds turning yellow while older fronds stay fine, check light and nutrient timing before assuming a disease issue.
If I grow palms from seed, what extra care do seedlings need compared with buying a nursery plant?
Yes, but the seedling needs a warmer and more stable setup than a mature palm. Keep the sowing mix warm (species-dependent, often around 77°F for faster germination), keep it consistently moist but well-draining, and expect wide variation even among seeds from the same palm.