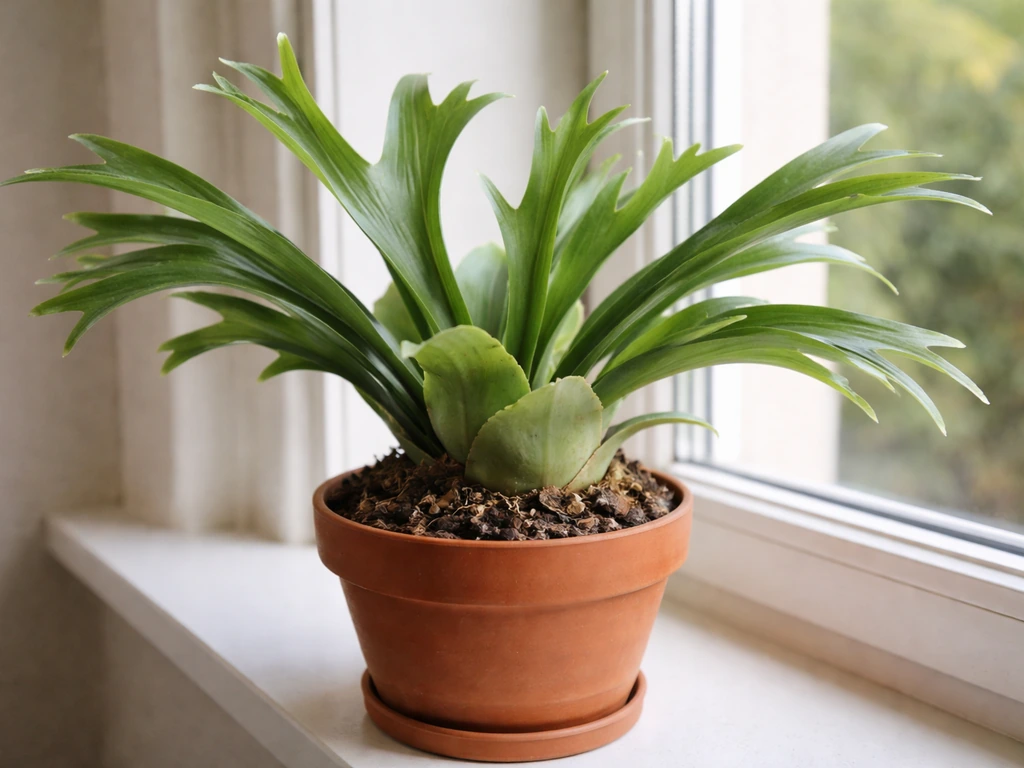
You can absolutely grow an elkhorn fern in a pot, and plenty of people do it successfully. The trick is treating it less like a typical houseplant and more like the tree-clinging epiphyte it actually is. That means a coarse, fast-draining mix (think orchid bark and sphagnum moss), a container with serious drainage, and a watering routine built around the 'drench and dry' principle. Get those three things right and you're most of the way there.
How to Grow Elkhorns in Pots Step by Step Care Guide

Marcus Whitley
18 Jun 2026
First, make sure you have an actual elkhorn fern
The name 'elkhorn' gets used loosely, so it's worth confirming what you have before you start building a care routine around it. The plant you're almost certainly dealing with is Platycerium bifurcatum, the species that gets sold as both 'elkhorn fern' and 'staghorn fern' depending on which nursery you're at. It's the most common Platycerium by a long way, and identifying it is pretty straightforward once you know what to look for.
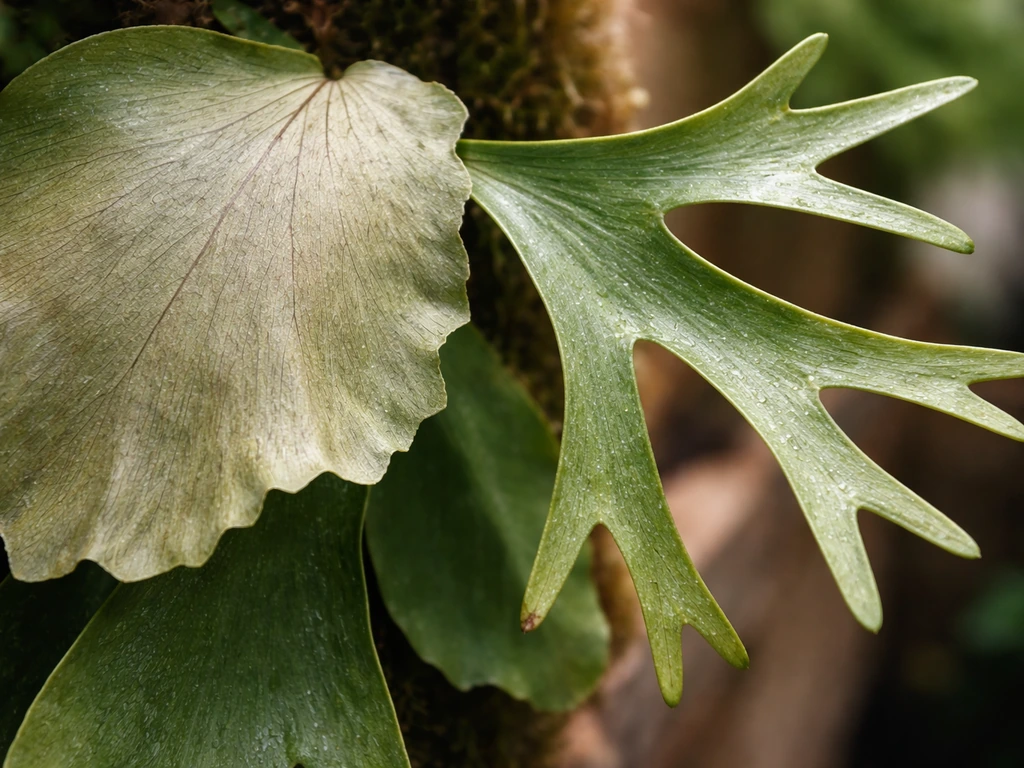
P. bifurcatum has two completely different types of fronds. The flat, papery, brownish ones pressed against whatever the plant is attached to are called shield fronds (also called basal fronds). These protect the roots and anchor the plant. The long, arching, repeatedly forked ones that grow outward are the fertile fronds, and they're the ones that look like antlers or elkhorns. Both frond types are normal and healthy. If your plant only has one type right now, it just means it's young or settling in.
A few other Platycerium species get sold occasionally. P. veitchii is smaller, slower, and has distinctly fuzzy, blue-green fronds. P. alcicorne looks similar to bifurcatum but its shield fronds are almost waxy and have noticeably less hair. If you're not sure which species you have, it doesn't change the basic care much, but P. bifurcatum is the most forgiving for beginners and the most likely candidate if you bought something labelled 'elkhorn.'
Pot vs mount: which one is actually better?
Here's the honest answer: elkhorn ferns grow more naturally when mounted on a wood slab or bark board. That's how they live in the wild, anchored to trees with air moving around the roots. Mounted plants dry out faster between waterings, which is exactly what they prefer. Wisconsin Extension and most specialist growers will tell you the same thing. But that doesn't mean potting doesn't work. If you want a similar pot-growing setup for bay leaves, use a fast-draining potting mix and keep the plant in bright light while avoiding soggy soil. It just means you have to compensate for the reduced airflow and drainage that comes with container life.
If you're committed to a pot for practical reasons (apartment living, hanging space limitations, aesthetics), the best compromise is a wire hanging basket rather than a solid-sided pot. Wire baskets allow air in from every direction, which is the closest you can get to mounted culture without actually mounting the plant. If you also want to know how to grow curry leaf plant in a pot, focus on similar principles like fast drainage and consistent watering. A basket around 10–12 inches wide is a good size for a medium plant. Line it with soaked sphagnum moss and fill with a coarse mix as described below. You get a container that behaves a bit like a mount.
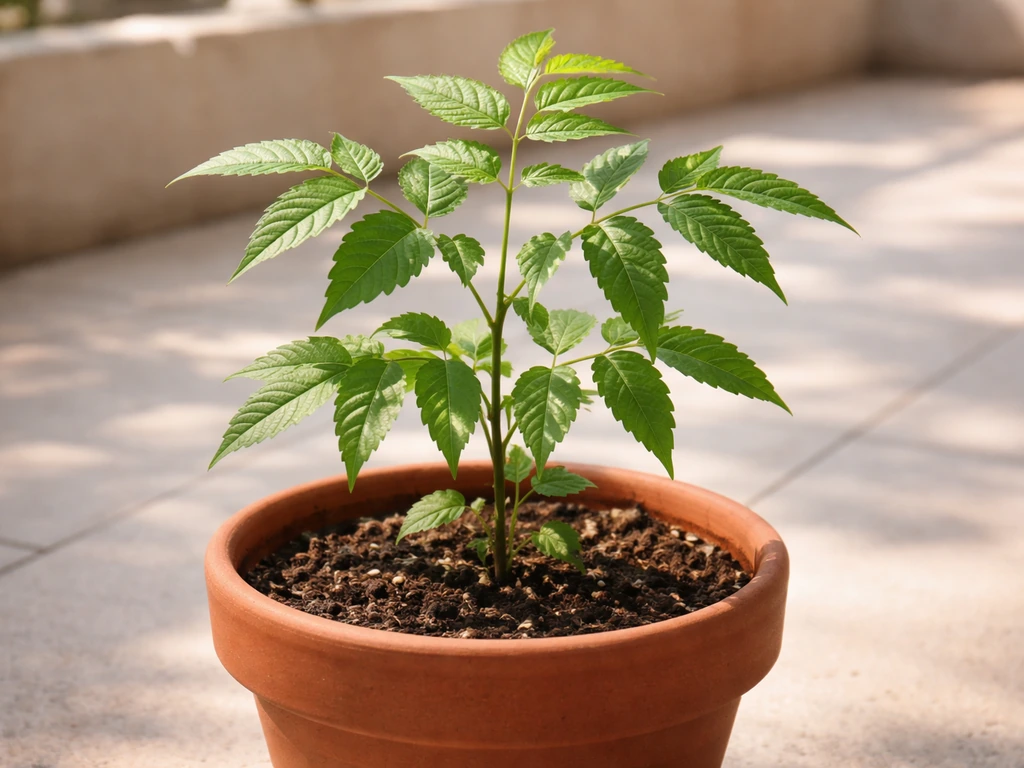
If you're using a solid pot, choose terracotta over plastic. Terracotta breathes and dries out faster, which reduces rot risk. Make sure it has at least one large drainage hole, and don't use a saucer if you can help it. A 6–8 inch pot works for younger plants. You can always size up later, but don't go too large too fast because excess media around the roots stays wet for too long and invites rot.
| Option | Drainage/Airflow | Rot Risk | Best For |
|---|---|---|---|
| Wood/bark mount | Excellent | Lowest | Experienced growers, wall display |
| Wire hanging basket | Very good | Low | Beginners who want a pot-like setup |
| Terracotta pot | Good | Moderate | Indoor/outdoor container use |
| Plastic pot | Poor | Higher | Not recommended |
The right potting mix and how to set the plant up
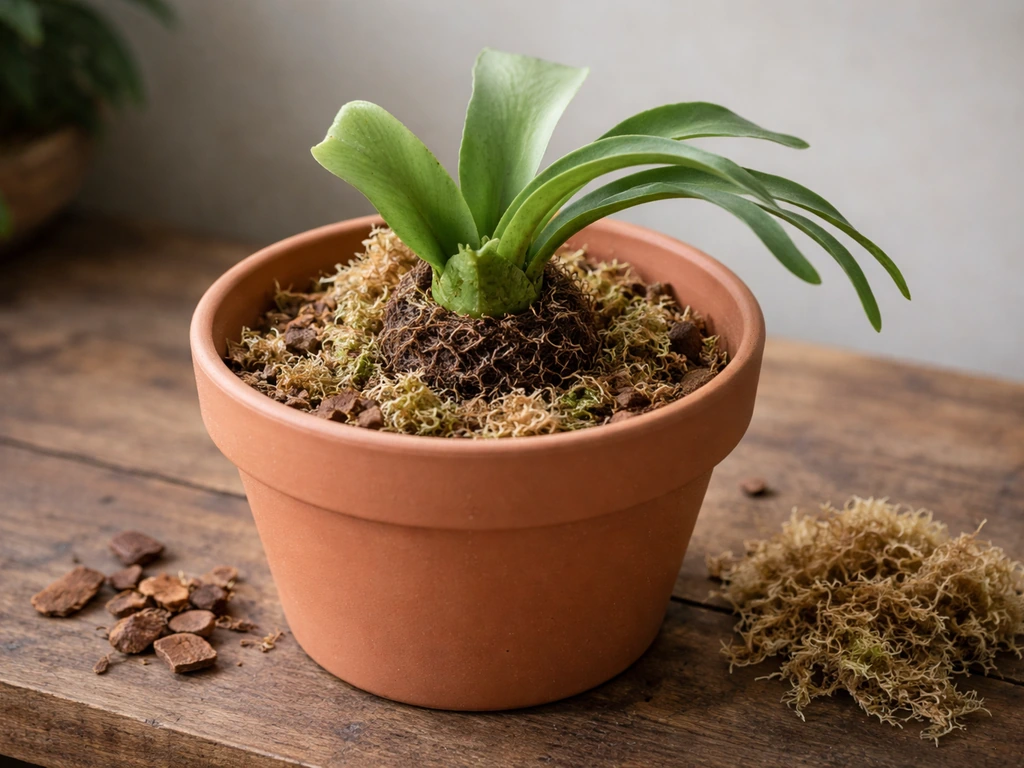
Regular potting soil is too dense and too moisture-retentive for elkhorn ferns. It will compact around the roots and keep everything wet for too long. What you want is something that drains fast, holds just enough moisture, and lets air reach the root zone. A good working mix is equal parts orchid bark chips, long-fiber sphagnum moss, and either cactus potting mix or a coarse, gritty potting soil. If you can only get two of those, orchid bark and sphagnum moss alone will do a decent job.
Soak your sphagnum moss overnight before using it. This matters because dry sphagnum can actually repel water initially, so pre-soaking means it's ready to hold moisture evenly from day one. Orchid bark doesn't need soaking but a quick rinse to remove dust doesn't hurt.
When you're placing the plant in the pot, the shield fronds (the flat papery ones) should be oriented so they're sitting against the substrate, not buried under it. The growing point at the centre of the plant needs to stay exposed and able to dry out. This is the spot most prone to rot, so don't pack media tightly around it or pile moss over it.
Think of yourself as giving the plant something to lean against rather than something to be buried in. For a wire basket, press soaked sphagnum moss into the basket liner first, then position the plant so its roots and shield fronds sit into the moss. For a fuller, step-by-step approach to growing elephant ears in containers, see our guide on how to grow elephant ears in a pot.
Light, temperature, and humidity
Light
Bright indirect light is the target. Indoors, a spot within a couple of feet of a north- or east-facing window works well. A south or west window can work if there's something to filter the harshest midday sun, like a sheer curtain. P. bifurcatum is more sun-tolerant than many ferns and can handle a few hours of gentle morning direct sun without issue. What it doesn't handle well is deep shade, which slows growth dramatically, or harsh afternoon sun that scorches the fronds.
Outdoors in summer, a sheltered spot with bright but filtered light is ideal. Under a pergola or on a shaded porch works well. Growers who bring theirs outside for the warmer months often report noticeably faster growth, and some notice the fronds start to grow more upright in higher light conditions. That's totally normal.
Temperature
Keep it between 60°F and 80°F (15°C to 27°C) and your plant will be happy. Don't let it drop below 50°F to 55°F for extended periods. Elkhorn ferns don't like frost or cold draughts, and they're not fans of heating vents either. If you're growing indoors near a vent, move the plant. The combination of dry heat and fluctuating temperature stresses the plant more than most people realise.
Humidity
These plants are from humid subtropical environments, so they appreciate moisture in the air. Aim for 50–70% relative humidity if you can. If you want to grow a henna plant in a pot, choose a container with drainage, use a well-draining mix, and give it plenty of sunlight to support healthy growth Aim for 50–70% relative humidity if you can. .
In dry indoor conditions (especially in winter when heating is running), a pebble tray with water under the pot helps. Grouping plants together also raises local humidity. Misting the fronds is fine occasionally but it's not a substitute for consistent ambient humidity, and you should avoid leaving water pooled at the base of the fronds or near the growing point.
Watering without rotting your plant
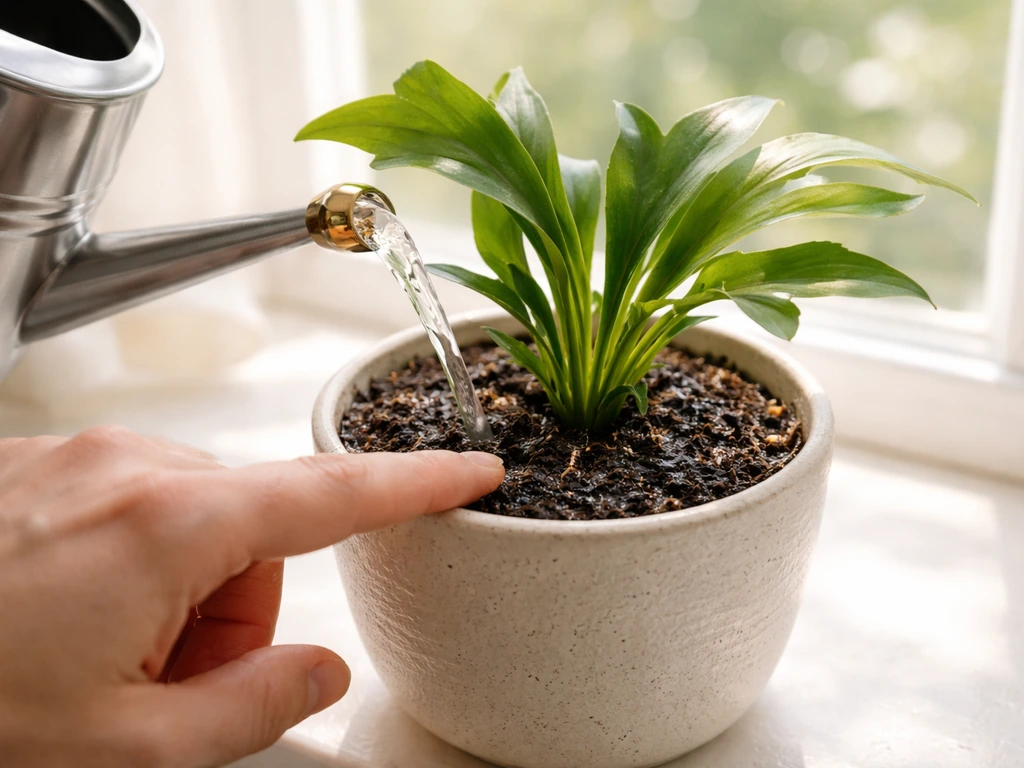
Overwatering is the number one way people kill elkhorn ferns in pots. If you prefer to grow other leafy herbs this way too, you can apply the same container focus when learning how to grow betel leaf plant in pot in pots. The drench-and-dry method is your best friend here. Water thoroughly when the top inch of your potting mix feels dry, then let it drain completely and don't water again until that top inch is dry again. The goal is cycles of moisture followed by a genuine dry-down, not constant dampness.
In summer, for a potted plant in warm, bright conditions, you might be watering roughly once a week. In winter when growth slows, that could stretch to every two to three weeks. If you are also growing a neem plant in a pot, similar watering care and drainage are key for preventing stress and root problems. These are starting points, not rules. The actual frequency depends on your pot material, your mix, your light levels, and your indoor climate. Check the mix with your finger rather than going by the calendar.
When you water, pour slowly and evenly over the surface of the mix, or lower the whole pot into a basin of water for 10–15 minutes and let it absorb from the base. Either method works. What you want to avoid is repeatedly pouring water directly onto the shield fronds and letting it sit there. Water pooling on top of the shields, especially at the crown where the new growth emerges, is a fast track to rot. After watering, make sure any excess drains completely.
If your elkhorn is in a wire basket lined with sphagnum, you can mist the outside of the basket lightly between waterings to keep the moss from drying out too fast in hot weather. This mimics the way a mounted plant gets some ambient moisture without getting waterlogged.
Fertilizing: feed it, but gently
Elkhorn ferns in pots do benefit from feeding because the limited media doesn't hold many nutrients on its own. Use a liquid fertilizer diluted to about one-quarter of the recommended strength. If the label says mix 1 teaspoon per gallon, use a quarter teaspoon per gallon instead. A balanced liquid fertilizer or one slightly higher in nitrogen works well. Feed monthly during the active growing season (spring through summer) and cut back to every six to eight weeks in cooler months.
If you've recently repotted or just set the plant up in a new pot, wait at least three to four weeks before starting to fertilize. The plant needs time to settle and establish before you add nutrients. Overfertilizing shows up as brown tips and crispy edges on the fronds, and it's surprisingly common because people see slow growth and assume the plant needs more food. More often, it needs better light or adjusted watering, not more fertilizer.
Apply liquid fertilizer to the growing mix rather than directly onto the fronds. Foliar feeding is sometimes mentioned but it's easy to overdo and can damage the plant's surface trichomes (the fuzzy, hair-like coating on the fronds that helps the plant manage moisture). Keep it simple and feed through the roots.
Troubleshooting common problems
Yellowing fronds
Some yellowing of the basal shield fronds is completely normal as they age and dry out. If the antler fronds are going yellow, it usually points to either inconsistent watering (both over and under can cause it), low humidity, or insufficient light. Check all three before adjusting anything, because treating the wrong cause can make things worse.
Brown, crispy frond tips
Dry, crispy tips on the antler fronds usually mean the air is too dry, the plant has been underwatered, or it's getting too much direct sun. Move it away from harsh light, increase humidity, and check your watering frequency. Brown tips can also appear after overfertilizing, so if you've been feeding regularly, cut back and flush the pot with plain water.
Black or mushy patches at the base
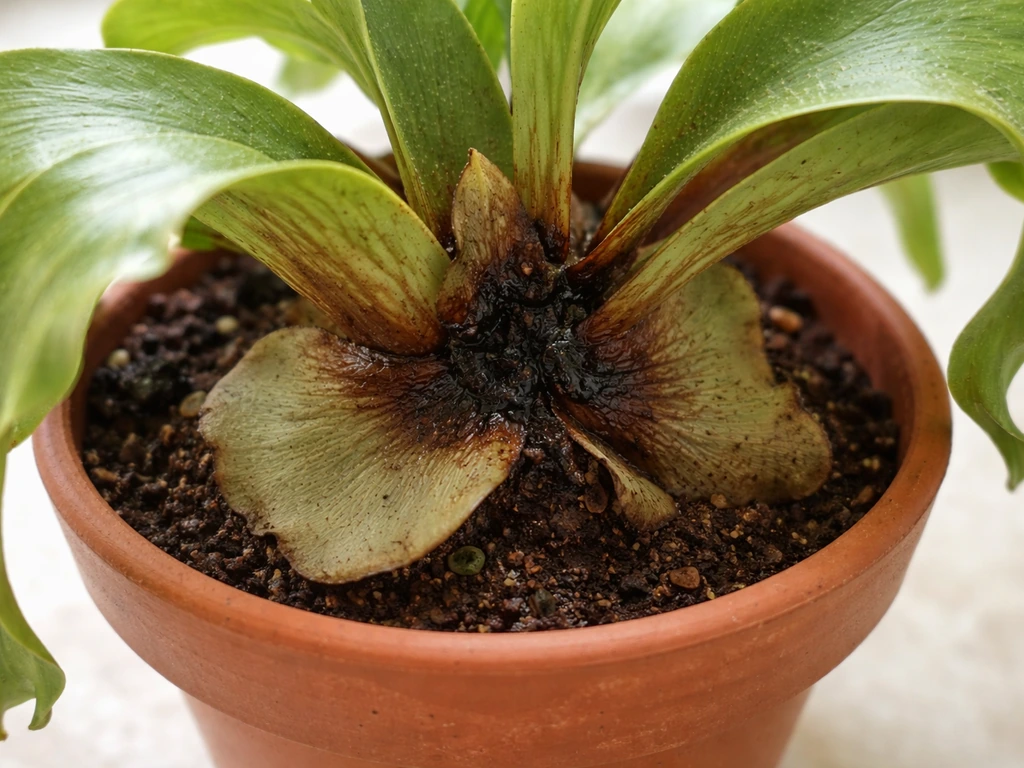
This is rot, and it spreads fast if you don't act quickly. Black, wet-looking patches at the crown or where the shield fronds meet the growing point almost always mean water has been sitting there too long.
One Reddit discussion on staghorn fern rot describes it as dark, wet patches that spread quickly, emphasizing that moisture being held too long in the moss or substrate near the shield zone can be the trigger Black, wet-looking patches at the crown or where the shield fronds meet the growing point almost always mean water has been sitting there too long. .
Stop watering immediately. If you can see clearly affected tissue, cut it away with a clean, sterile blade, allow the cut surface to dry, and reassess your watering schedule and drainage setup. If the core of the plant is mushy, recovery is unlikely, but if you catch it early, the plant can often pull through once conditions improve.
Slow or stopped growth
Sluggish growth is usually a light problem. Move the plant somewhere brighter before changing anything else. Temperature below 55°F will also slow growth significantly. If light and temperature are fine, check whether the roots have filled the pot (time to repot) or whether the potting mix has broken down and compacted over time (also time to repot).
Pests: scale, mealybugs, and fungus gnats
Scale insects look like small brown bumps stuck to frond surfaces. Mealybugs appear as white cottony fluff, usually in the joins between fronds or at the base. Both can be tackled by dabbing a cotton swab soaked in rubbing alcohol directly onto the insects, or by applying insecticidal soap to affected areas. Test any spray product on a small section of frond first, and avoid horticultural oils on species with heavy, silvery trichome coatings as the oil can clog them. Manual removal is safer as a first step.
Fungus gnats are the small flies you see hovering around the potting mix. They breed in consistently moist organic media, which is why damp sphagnum moss is a favourite habitat. Let your mix dry out more thoroughly between waterings and use yellow sticky traps near the pot to catch adults. For the larvae in the soil, a drench with Bacillus thuringiensis var. israelensis (sold as Bti or Gnatrol) is effective and safe for the plant. Healthy, properly watered plants tend to have far fewer pest problems overall, so getting your watering dialled in is the best prevention.
Repotting, maintenance, and propagation
When and how to repot
Repot when roots start pushing out of the drainage holes or when the potting mix has degraded into a compacted, soggy mass that no longer drains well. Orchid bark breaks down over time, usually after one to two years, and when it does, water starts pooling instead of draining through. Spring is the best time to repot. Go up only one pot size at a time, maybe an inch or two wider than the current container. Too large a pot means too much wet media around the roots.
When repotting, be gentle with the shield fronds. They can look tough but they're attached to the growing point and tearing them can damage the plant. Tease old media away from the roots carefully, trim any dead or rotted root material with clean scissors, and set the plant into fresh mix using the same orientation as before: shield fronds against the substrate, growing point exposed.
General maintenance
Don't remove the brown shield fronds. This is probably the most common mistake beginners make. Those brown papery fronds protect the roots and contribute nutrients to the plant as they break down. Removing them stresses the plant and leaves the root zone exposed. Leave them alone unless they're clearly rotted (dark and mushy rather than papery and dry). Rotate the pot every few weeks so all sides get even light and the plant grows symmetrically.
Propagation basics
The easiest way to propagate an elkhorn fern is by dividing pups. Mature plants produce small offsets, called pups or plantlets, that appear around the base of the parent plant. Once a pup has developed its own small shield frond and is at least a few centimetres across, you can carefully separate it from the parent using a clean knife. Pot it up in the same orchid bark and sphagnum moss mix in a small pot (3–4 inch), keep it warm and humid, and water sparingly until it establishes. It will be slow to get going but should settle in over a few weeks.
Growing from spores is possible but it's a long process (we're talking months to years) and not worth the effort unless you're specifically interested in the challenge. If you're starting with a young plant bought from a nursery, just focus on getting the basic care right. A well-cared-for elkhorn in a pot can grow into a genuinely impressive specimen over a couple of growing seasons, and from there, you'll have pups to share.
FAQ
Can I use a regular terracotta pot and put it on a saucer to catch runoff?
It’s better to avoid a saucer, because runoff can wick back into the mix and keep the crown zone too wet. If you must use one for furniture protection, empty it promptly after watering, and verify the pot truly drains freely through a large hole (one big hole is usually safer than many tiny ones).
My elkhorn fern is in sphagnum around the roots, how do I prevent the moss from staying soggy?
Only the liner should be damp, not saturated. Pre-soak sphagnum, then press it in firmly so excess water drains out before you set the plant. Between waterings, let the potting mix portion dry back at least to the top inch, and if moss looks uniformly dark and wet for days, increase airflow and consider switching to slightly more orchid bark in the mix.
How do I know whether it needs more water or more humidity?
Look at the fronds and timing together. If the potting mix is staying damp and shields are starting to look waterlogged or dark, that points to overwatering. If shields look fine but antler tips turn dry or crispy and the plant is in a very dry room, that points to low humidity or occasional underwatering. Checking the mix with your finger within the same day is the tie-breaker.
Is it okay to water by pouring directly over the top if I avoid the growing point?
Better to water evenly over the mix surface, not directly onto the papery shield fronds. Even if you avoid the exact crown spot, repeated wetting of the shields can trap moisture and raise rot risk where fronds meet the base. If you see water sitting on top after watering, switch to bottom watering (10 to 15 minutes) or increase the drainage speed of the mix.
Should I mist the fronds daily or use a humidifier every day?
Daily misting usually isn’t enough to raise ambient humidity consistently, and it can create repeated wetness at the crown if droplets linger. If you use a humidifier, aim for stable humidity (around 50 to 70%) and keep the crown dry. Mist occasionally for comfort, but treat it as supplemental, not the main humidity strategy.
What’s the best pot size for a young elkhorn fern, and when should I size up?
Start with a snug size like a 6 to 8 inch pot for younger plants, then move up only after you see roots pushing out of drainage holes. When sizing up, go one step at a time (about an inch or two wider) so the extra mix doesn’t stay wet and invite rot. If growth stalls but the mix still drains quickly, it may not need a larger pot yet.
Do I need to rotate the pot, and will rotation stress the plant?
Rotation helps, because light often falls more on one side indoors. Rotate every couple of weeks, quarter turn each time, to keep growth even without constantly disturbing the setup. Rotation doesn’t typically harm elkhorn ferns, but avoid frequent repotting or major light changes at the same time.
How long can my elkhorn fern go between waterings in winter?
In winter, watering commonly stretches to every two to three weeks, but the real indicator is dryness of the top inch of the mix and your light level. If the room is cool or the plant gets less light, it will dry slower, so use the finger test and water less often rather than sticking to a calendar.
What fertilizer is safest, and how do I avoid burning tips?
Use a liquid fertilizer and keep it diluted to about one quarter of the label rate. Apply to the mix, not directly onto the fronds, and pause fertilizing for at least three to four weeks after repotting. If you see brown tips and crispy edges, stop feeding and flush the pot with plain water to reduce salt buildup.
Can I grow an elkhorn fern in a hanging basket, but without wire or without drainage?
A hanging wire basket is helpful because airflow comes from all directions, but the key requirement is that water can drain freely and the crown never sits in pooled moisture. If your container lacks good drainage, it’s high risk. If you’re improvising, prioritize open airflow (mesh or wire) and use a lined setup that doesn’t hold standing water.
My plant has both shield fronds and antler fronds, but one type seems to stall. Is that normal?
It can be normal during settling. Shield fronds often change first as the plant adapts, and fertile antler growth may lag if light or watering isn’t quite dialed in. However, if antlers stop entirely for a long time while shields look stressed (mushy, dark, or increasingly dry), revisit light intensity and the drench-and-dry moisture cycle.
How do I handle scale or mealybugs when they’re in the frond joins?
Scale and mealybugs often hide where fronds overlap. Use manual removal first (cotton swab with rubbing alcohol) and focus on frond joins and the base where the insects cluster. After treatment, monitor for a week and repeat if you still see bumps or cottony patches, because eggs and hidden insects can survive a single pass.
What should I do if my elkhorn fern is rotting at the crown but the shield fronds look mostly okay?
Stop watering immediately and switch to a “dry down” period while you assess. If the core is still firm and only the base area looks wet, you may be able to cut away clearly affected tissue with a sterile blade and let the cut dry before resuming light, careful watering. If the crown feels mushy, recovery is unlikely, but improving drainage and airflow can still prevent spread to remaining healthy tissue.